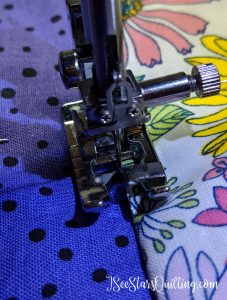
To “stitch in the ditch”, or not to “stitch in the ditch”??

Let me back up for just a minute… “Stitch in the ditch” (also referred to as Ditch Stitching) is a catchy name for a simple quilting technique. It is one of those bits of sewing terminology that make beginner quilters look at you like you have 3 heads. I believe my first response was…
What the what?
Once I show you a picture, you’ll know exactly what I mean. And don’t worry, it isn’t a complicated technique. It is simply making your line of stitches in your quilting in the “ditch” where two fabric pieces meet. 
Most quilters I know are divided on this technique 50/50. You either love it or you hate it. There is not much in-between. Don’t ask me why. Some of us are just very opinionated and set in our ways.
We’ll get to my personal opinion in a little bit. First, let’s get to some tips to help you with this technique! It’s time to put your learning caps on!
6 Tips to Stitch in the ditch
First…
1. Sit square in front of the sewing machine – This is not rocket science, but it is non-negotiable. I know some of us have tiny makeshift workstations on the corner of our dining tables or are crammed in the guest bedroom somewhere. You need to make yourself some space, even if its temporary.
So get some elbow room and then cozy up to your machine. You will need to be in complete control here.
2. Very closely watch where your needle pierces your fabric. – Your seems are more than likely very straight lines for this quilting technique. You don’t need to be looking ahead to see where you’re going or when that big corner is coming. You need to focus on exactly where you are at this very second in your sewing. Needle to fabric is where your eyes need to be. 
3. Placement of your hands – Any wiggle of your fabric is going to take the stitching out of this very small margin that you are aiming for. You’re going to get a wobble in your perfectly straight line and end up having to get the seam ripper out. So keep your hands engaged on the quilt the.entire.time. No free willy-nilly letting the universe take over. No exceptions.

So the above picture was not ‘wiggled’ on purpose. I was quilting this piece and I thought I should grab my camera and photograph this process to show you this technique. – I kid you not, I looked away for 2 seconds and BAM. I got off track.
Above and below that wiggle is stitched invisibly even though I’m clearly using black thread. It disappears into the line between the 2 fabrics.
…Just so you know who you are dealing with here… I don’t make mistakes on purpose so I can show you what a less experienced quilter would do… No no… they come completely naturally to me all the time. You’re welcome.
4. Stitching in the ditch is not a race. – Seriously. If you have to go slow to avoid making a mess of things, go slow. You must maintain control if you want to keep your stitches invisible. If your machine has a speed control, USE IT! Better to go slow and get it right than to speed along and have to spend time with the seam ripper later.
6. Pressing matters! – Your seams must all lay flat with no pleating of the seam allowances behind your seam line, no bunching of the fabric. Just pressed beautiful flat seams. Got it? If you hit a bump or a snag when stitching in the ditch, you’ll get a wiggle. We already went over wiggles in step #3. We don’t want them, ok?
6. And finally, take the time to switch your sewing foot to the right one – You’ll hear me say this again and again because I was THAT GIRL in my early quilting days… I never changed the sewing foot on my first machine. Like, EVER. (I know… ugh.)
So now that I know better, I’m going to try to save you from those stupid mistakes. I have been scolded by many women that I look up to so please don’t send me hate mail, ok? Thankfully, I know better now. The right tools make all the difference in your finished product.
This is the foot you want for stitching in the ditch.


See that little bar there in the middle? That shows where your needle will go. Watch it, guide your quilt with it in the middle of your seam and it will be totally golden.
If you are working with a much heavier quilt sandwich (top side fabric, batting, bottom side fabric) You may want to use your walking foot to help move everything at an even pace. (I wrote a whole post on when to use a walking foot. You can read all about it here)
You don’t have to have the little middle guide bar on your presser foot. It’s just kind of a bonus because it pushes your fabrics to the side so you get a clear middle… Keep an eye on the needle. That’s what matters the most.
OK! – So now we’ve been over what “stitching in the ditch” is and how you can do it/ improve your skills with it. If you’re cool with that and feel good about where you are at, you can stop reading here. (Really, I don’t mind)
—————————————-
But if you care to know my thoughts on the
technique… well then, oh-please-do read on!
—————————————-
(Yay! I’m glad you’re still here!) Remember how above I told you that a lot of quilters are very opinionated? uh-huh… well, here is my take on this ditch stitching stuff.
Stitching in the ditch serves one purpose. It keeps your quilt sandwich from falling apart in the wash. The End.
Ditch stitching gets the job done, but it doesn’t add texture. It doesn’t add a layer of design to your beautiful piece. It doesn’t add anything.
While modern quilting is often times with clean and minimal design, I believe the quilting or stitching is there to enhance the overall quilt. It’s a completely different art in itself. You don’t have to be fancy with it to let it add dimension to your quilt. Even if you keep it simple, your quilting can magnify your pattern choices.
The reality is that quilting and what you choose to do depends on what you want your audience to appreciate in your piece (even if it’s you). Do you want them to appreciate your exquisite skills? Your attention to detail? The fabric choices you made? All of this is decided in your quilting method of choice.
So what do you think? What is your take on stitching in the ditch? are you a lover? A hater? Let me know your thoughts in the comments!
