Today I’m going to share with you my absolute No-fail Quilt Binding Formula secrets. Whether you like to make your quilt binding the star of your quilt or you prefer it to just hold everything together and be more subdued… you need to know how much of it to make. Making too much binding is frustrating because it feels like a waste of fabric and time… but make too little binding and … ugh. It’s so so much worse!
So, let’s get it right the first time and every single time after this, shall we? Then you’ll never have to question your measurements or pray that it all works in the end again! Sound like a dream?
If you can calculate your binding length in advance, you can more effectively use the fabrics you have on hand or know exactly how much fabric you need to purchase.
Any major pattern should come with all your fabric requirements already calculated. If you are sewing your own project (go you and your creative self!) you’ll need to do a little math to determine the yardages you will need to complete your quilt top.
At this point, you should have your quilt top plus your batting and backing already assembled and quilted as the binding is usually the last and final touch put on a quilt.
No Fail Quilt Binding Formula
- First, Square Up Your Quilt. There is no going back to re-do this part. Do it now and do it right.
Your quilt will need straight 90 degree corners. Measure the center of your quilt. The left and right sides of your quilt should be the same length as the quilt center. Do these measurements horizontal and vertical.

- Calculate the binding requirement – First, you need to figure out the perimeter of your quilt. This is the measurement all the way around your quilt.
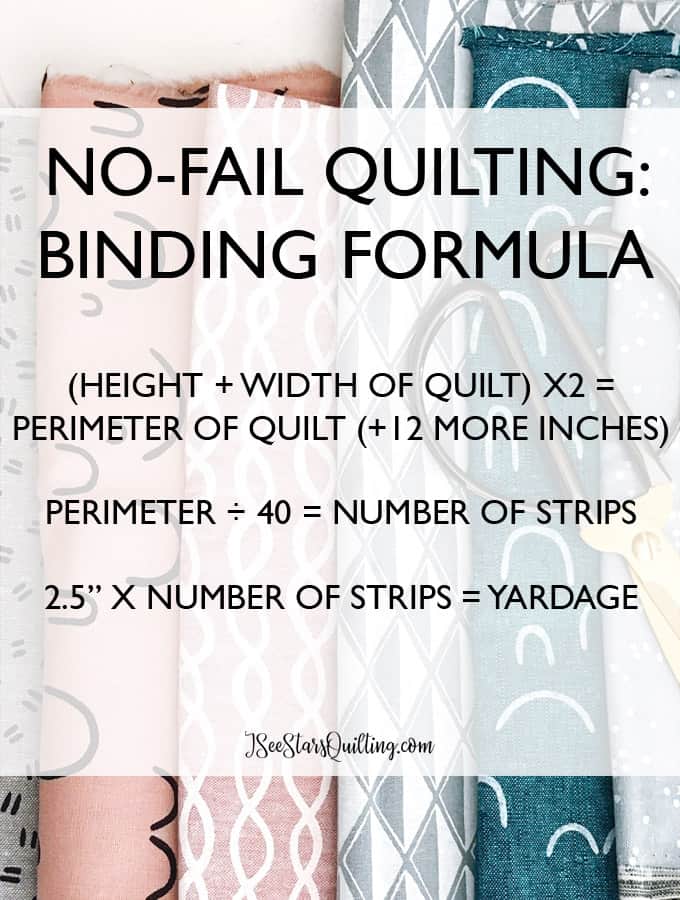
Measure the width and the height of your quilt, add those numbers together and multiply by 2.
(Width + Height = Number) x 2 = Total perimeter of your quilt.
Take Perimeter measurement of your quilt and add 12″ for seams, corners, and finishing.
This number is the total binding length needed! See this example below
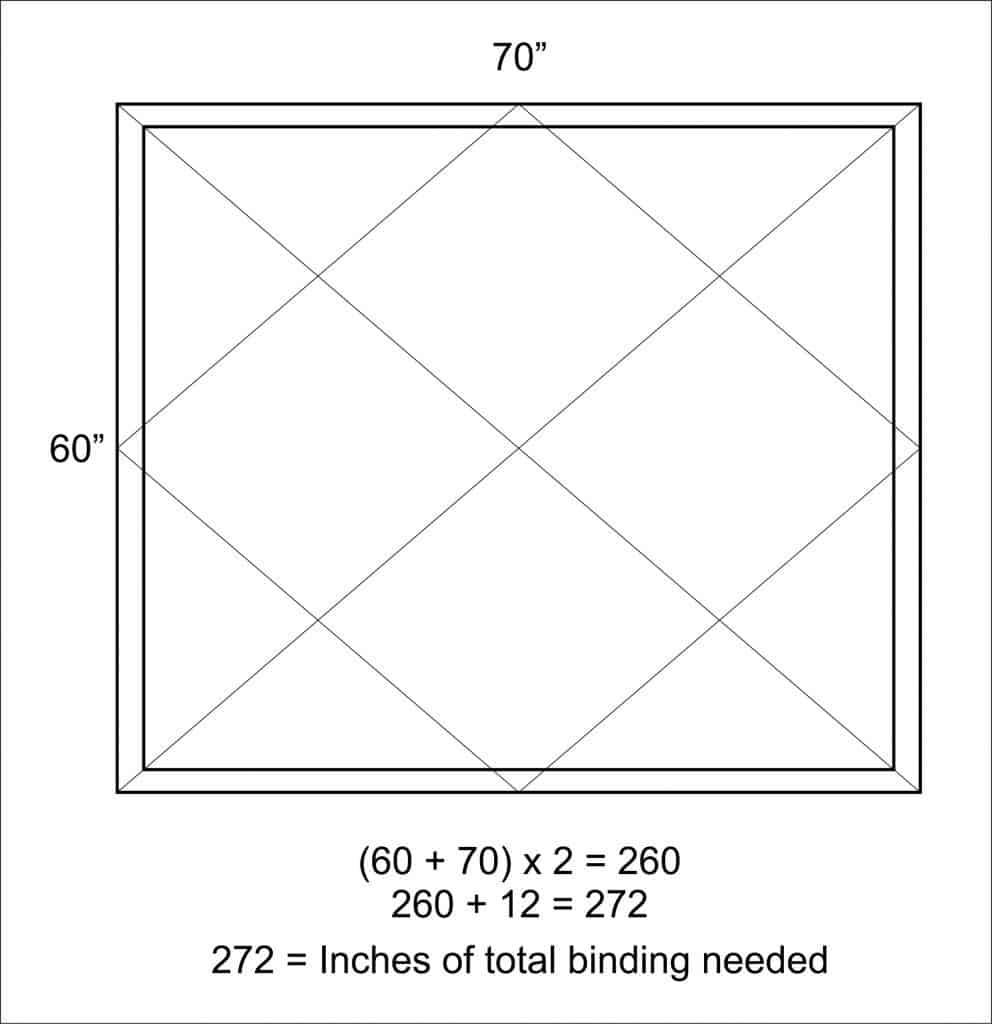
- Piecing your binding – Using the example above, odds are that you do not have a continuous piece of fabric that is 272″ long. You’re going to need to piece it together from pieces of fabric.
Most fabric is about 44” wide, but once you trim off the selvages, you’re left with about 40-42” of workable yardage. Let’s go with 40” to be safe because you also have to account for joining the strips, plus a mitered corner. Better to be safe than sorry!The next step is to work out how many strips we need to cut to make at least 272” of fabric. To figure that out, you’ll need to divide the perimeter of your quilt by 40, and round up to the nearest whole number. For this quilt, that’s 272 ÷ 40 = 6.8. So you’ll need 6.8 strips that are 40″ long… or just round up to 7 whole strips.
All these numbers mean nothing when you’re trying to gauge how many yards of fabric you’ll need… which leads me to the final step.
- The last step is to multiply the number of strips by the width of the strips to work out how much yardage you need.
Using our example quilt, 7 strips x 2.5″ width = 17.5. So we’d need 18” of fabric to make the binding for this quilt.
I know its a little math, but us quilters have learned to be absolute wizards with fabric. A few little, simple calculations are nothing we can’t handle! Let me know if you have any questions or give me a comment below. If suddenly a light bulb went off and you’re now feeling extra equipped in your sewing knowledge today, tell me!
Happy Quilting!
PS – I made this chart that you can pin for easy reference to the no-fail quilt binding formula.