My Quilts

Want to see what I sew? Take a closer look at some of my projects and quilts that I have worked on in the past.

  • Full Review of The Atomic Starburst Quilt Pattern from Violet Craft

    AtomicStarburst Pattern by Violet Craft

    Hey there happy quilters! As promised, here is a full review of the Atomic Starburst Quilt Pattern from Violet Craft. Plus I went ahead and shot a video to share some tips with you on the paper piecing process.

    You can purchase the pattern from Violet Craft’s website and download it immediately, or I’ve seen this pattern in person at several quilt shops as well. (Side note: if you aren’t familiar with Violet Craft, take a few minutes to pop on over to her website. She is an absolute gem and a genie with fabric!)

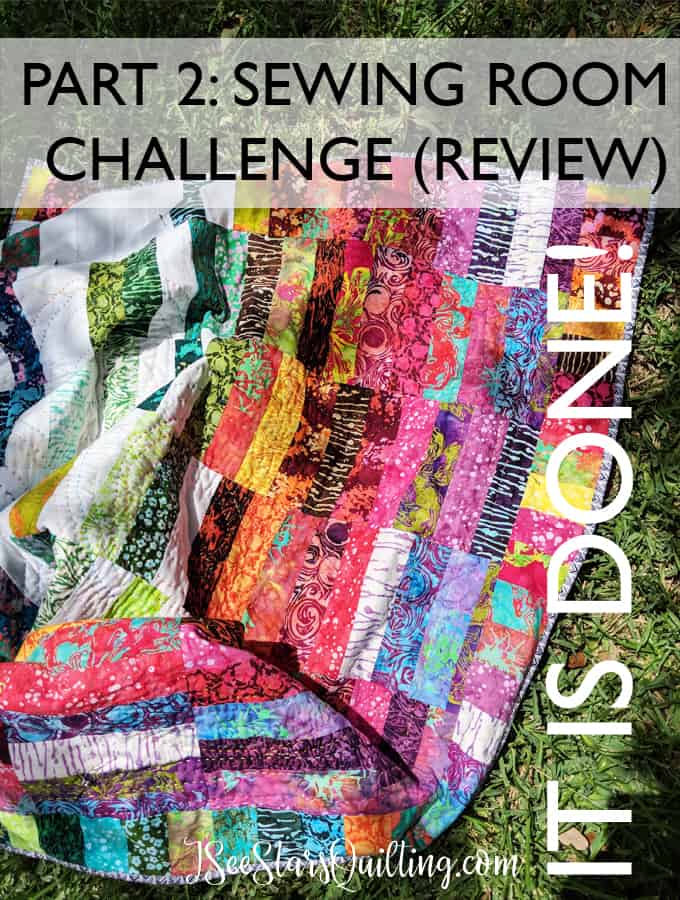
    I just wrapped up my Sewing Room Challenge! (to catch up, you can read part one and part two) And I had some questions from people who were tentative to dive into this pattern. I get it. All those pointy stars… I lurked and gazed at this pattern from afar for several months before I purchased it. And then, I had it in my stash (with all the fabric I had chosen!) for another month before I did any cutting or sewing. Wimpy baby steps, right?

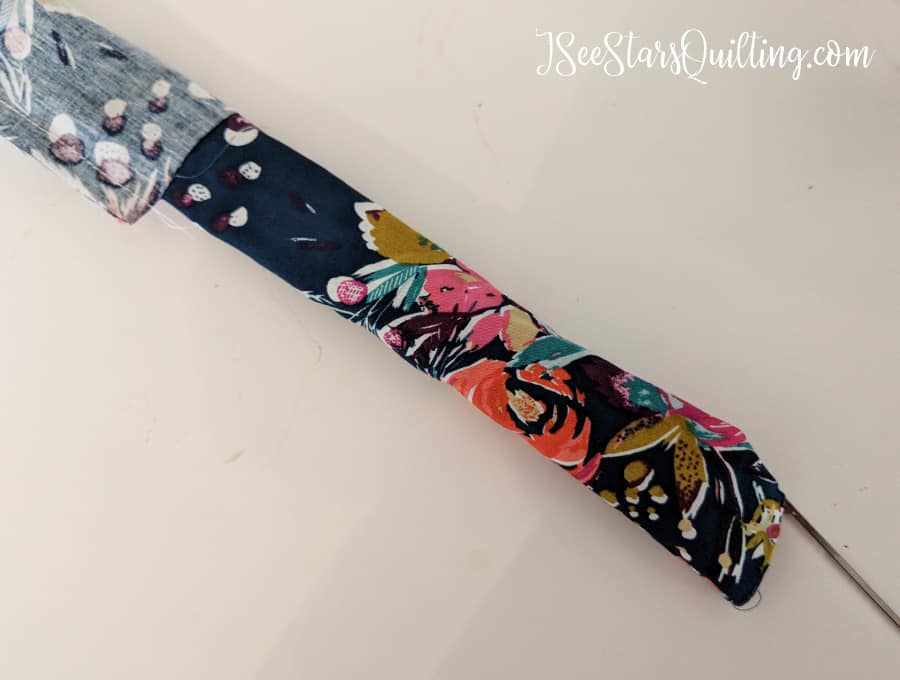
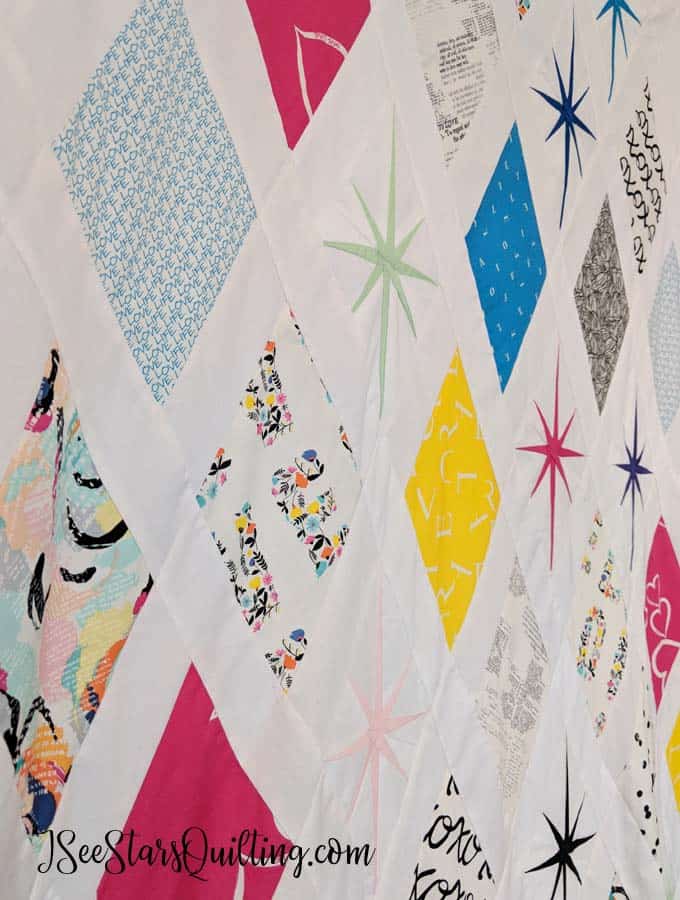
    I’m not the best at paper piecing. It doesn’t come naturally to me. I don’t know why. But after working on this quilt top, I have decided that I want to work some more with it in the future because I love the results that it yields! Just look at these stars! They turned out so lovely, and the quilt just sparkles.
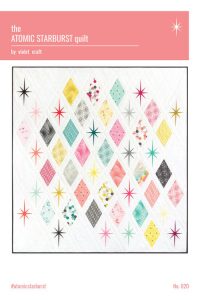
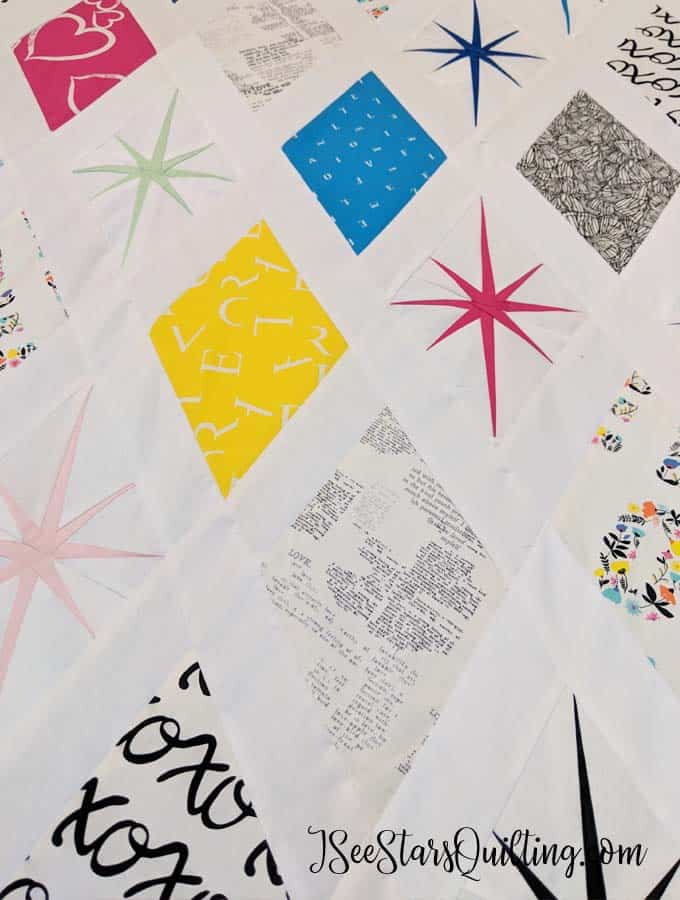
    Atomic Starbust Quilt Pattern

    The Description:

    This quilt is speckled with mid-century-inspired paper pieced stars laid out in a modern diamond pattern. The simple, light background makes the colorful Palm Canyon fabrics and coordinates pop. A generous lap size at 62 x 66.

    This quilt is made by combining foundation paper pieced Starburst blocks with traditional piecing. The result is a vibrant, happy mix of stars and solid blocks.

    Paper Piecing Advice:

    I put together a video that goes over some of the tips and tricks that I used while paper piecing the Atomic starbursts. I hope you find it helpful 🙂 Keep reading below!

    Links to the tools I used, just FYI: Rotary Cutter, Add a Quarter Ruler, Cutting Mat

    Review of the Atomic Starburst Quilt Pattern by Violet Craft

    The Review:

    This Atomic Starburst quilt pattern has 5 stars on Amazon. And 5 Stars on several Etsy shops as well. Actually, I couldn’t find a single review site that has any less than five stars.

    This pattern has been very well received by the quilting community, and people have been giving it glowing reviews from day one. (I told you I stalked this pattern for a while before I purchased it!)

    ISeeStarsQuilting 5 Star Review

    I give it a full five stars (now that the quilt is finished. Keep reading for more explanation). I’m entirely in love with the result and I can’t wait until I quilt the whole thing.

    The Process:

    I love the atomic starbursts. They are my favorite part of the pattern. There are 20 total in the pattern, and they are stunning scattered throughout the quilt.

    I’ll let you in on a little secret. It wasn’t all sunshine and roses the whole piecing process… In my personal experience, it seemed like some on again off again teenage romance between me and the atomic starbursts.

    There are 20 stars in the pattern, so that equals 40 halves to the stars. (you paper piece each half and then sew together to complete each star) For a while, I thought I had been caught in some time loop alternate universe where it didn’t feel like I was making much progress at all. I was trying my best to sew in tiny chunks of time to make progress any way I could. It still felt slow and I was slowly getting more and more frustrated.

    One Saturday morning I let the kids play and watch a few movies (hey, it doesn’t happen too often, but they were happy, I was happy). I sewed and sewed and sewed and I finally turned a corner. After that day, I tried to work in larger chunks of time for at least 30 minutes.

    I think once you turn that corner, and have just over half of your starbursts created, THAT is when the 5-Star review mode kicks in.

    I don’t want to be all doom and gloom, but I do want to give a frank depiction of the process.

    Don’t let the work discourage you. It was totally worth it.

    The rest of the quilt was an absolute joy to continue making, and I couldn’t be more pleased with the way it turned out!

    Atomic Starbust Quilt Pattern

    The Finished Product:

    I wish I could put down the beautiful photo shoot with my quilt right here, but the truth is… It is going to be a little bit before I call this one finished. 🙁 I have a friend who has a lovely long arm machine and has agreed to teach me to sew on it. So I am saving this quilt top for the long arm machine. As soon as it gets done, I’ll post a few update pics.

    Instagram sees most everything first and you know I’ll be posting pictures of the whole process and the in-between shots. Follow me on Instagram here. You can also tag me @iseestarsquilting

    Also, It is worth mentioning that as slow as this quilt top felt at the start, by the end of the piercing, I was already planning another quilt with the same pattern! I’ve seen a few pictures where someone used a dark/navy background, and it was stunning! – I won’t be working on it just yet… but someday, I would love to make another Atomic Starburst Quilt.

    Are you going to try out the Atomic Starburst Quilt?

    What do you say? Have I convinced you how awesome this pattern is? Did I scare you with the amount of work involved? Have you already started this pattern? Let me know in the comments. I would love to see your versions of the atomic starburst quilt out there!

    Happy sewing!

  • Part 2: The Sewing Room Challenge

    Have you been waiting for this Sewing Room Challenge reveal like I have? – I’m really excited to share this with you! Let’s spill all the goods and all the pictures on the 3 latest projects that I’ve been working on!

    Give this page just a second to load because I promised I would be sharing pictures like it was another child of mine and you’re about to see the new triplets now 🙂 Lots and lots of beautiful photos!

    Sewing Room Challenge

    Two months ago, I was a little lost in all the projects I had going on… there were so many ideas and so many possibilities. Oh to be blessed/cursed with so many ideas but not enough hours in the day! (yes, I know… this is life. what a trivial thing to complain about.)

    There were two big quilts in particular that I felt constantly looming over my shoulder waiting with all the hours and hours ahead that it was going to take to finish each of them. Do you have those daunting projects that you started with such vigor, but now they just taunt you in a corner waiting to be finished?

    I decided to create a Sewing Room Challenge for myself (which a few of you decided to join me on! yay for you!)

    You can read the full Sewing Room Challenge post for yourself.

    In a nutshell, the rules were simple because that is how I like things…

    The Sewing Room Challenge Rules

    • 60 days
    • Take on no new projects, don’t even think about it
    • Work work work work work

    June 30 was the final day and I am so excited to finally share the full pictures of what I’ve been working on.

    The First Project

    AtomicStarburst Pattern by Violet Craft
    Image from VioletCraft.com


    Have you seen this pattern from Violet Craft? It was love at first sight for me. (duh, of course, I love the stars) I had been crushing on it for several weeks before I finally dove in and purchased the pattern (without a full plan in mind yet). The Atomic StarBurst Quilt Pattern. You can purchase it from her website if you like it too.

    I plan on doing a full post review of this pattern, but until then, you’ll get the condensed version here.

    It was an absolute love/hate relationship from the very beginning. If you follow me on Instagram, you saw my struggles… (PS, I share more details and behind the scenes pics on Instagram. Its totally my favorite place to hang)

    The larger pieces were easy. The starbursts were… repetitive and took a bit to get the hang of it as well as where the paper piecing lines fell and getting the fabric just so. I MIGHT have wined a little bit about it while working on it for hours and hours one night… but I have to be honest here. Somewhere around star number 12, my thinking shifted and I caught myself planning another quilt with this pattern! Excuse me, who am I? I thought I hated this pattern?… well… come to think of it, gold and white would make a really beautiful star design… ooh! I could pair it with a baby pink and a rose gold fabric!

    So who knows what the future holds. As for right now, I am happy to have this quilt top completed. I plan on spending some time on a friend’s long arm machine to get it quilted sometime this summer!

    Atomic Starbust Quilt Pattern

    The material I chose was mostly from Art Gallery I love their organic cotton fabric almost as much as I love their fresh modern designs. You can read more about why organic cotton is so important in this recent post of mine. 

    Atomic Starbust Quilt Pattern

    I promise I’ll update this post with pictures of it completed as soon as I get the backing and the quilting completed!

    UPDATE: You can read my full review of this pattern here! I also included a video to help you with foundation paper piecing!

    The Second Project

    OK, I’m super proud of this one. This one is mine mine mine. I made it larger in size so that my husband and I can share it while we’re sitting on the couch together. There is plenty of quilt to go around.

    I also made the decision early on that THIS was the lovely one that would be my first adventure with hand quilting. (ambitious? yep.)

    Sewing Challenge - Waterfalls Quilt

    The stitching is not perfect. I would be laughed off the face of the earth if I ever took this to a quilt show. I know I am not an expert and I guarantee I can point out all the flaws before you can! I learned a lot with hand quilting and experimented with different stitch lengths. I finally settled on a chunkier thread for more of an artistic look to the quilting instead of it just holding everything together.

    *Hint* If you look closely in the photo above you can see that I still have the fabric marker on the quilt that I used as a guide for my droplets pattern. oops.

    Sewing Room Challenge - Hand quilting supplies

    I carried this box and that giant quilt with me every time I went to my mom’s house. It kind of became a part of me for a while and I have a weird finger muscle sprain in my index finger to prove it. (It’s really embarrassing to explain to someone that your finger is sprained because you couldn’t quit hand sewing every single evening so as to finish a deadline that you set for yourself… especially when you have an awesome sewing machine just a few feet away.)

    Sewing Challenge - Waterfalls Quilt

    It is finished but I can’t show you the whole quilt just yet. This is a quilt pattern that I have been playing with for a while and I finally completed it! I am in love with the results! It’s so beautiful… and I know you are going to LOVE it!

    Coming Soon from I See Stars Quilting...

    This lovely quilt is called Waterfalls. And I will be releasing the full pattern towards the end of this summer. Join my e-mail list and I’ll send you a free quilt pattern (plus some other fun freebies!) of mine and keep you up to date with any other goodies I release in the future!

    One small detail that I just fell in love with in my Waterfalls quilt is the binding I chose! Look how fun this is!

    Sewing Challenge - Waterfalls Quilt

    The Third Project

    This last quilt one is another pattern of my own design. I’ll be releasing this pattern soon too. (Fingers crossed it is all tested out and ready for August 1!) UPDATE: It’s all good to go! You can get your FREE copy of this game-changing pattern by filling out the form below. 🙂 My gift to you!

    This pattern is one of my favorites because it looks so impressive and detailed! It is always such a lovely gift to give/receive a handmade quilt, right? It’ll look like you spent a long time on it but honestly… it’s so simple. I’ll share with you a few tricks and tips to make you look so fancy in the sewing room!

    The Busy Momma, Busy Baby Play Mat quilt top comes together within a few hours start to finish. It’s the perfect pattern for busy girls because it doesn’t have to take too much out of your busy schedule to make a wonderful handmade quilt. I promise! This one is one of my favorites for gifts!

    Sewing Room challenge - Busy Momma, Busy Baby Playmat

    This one is still a slight work in progress… I didn’t finish EVERYTHING on it by the time June was over. I would have liked to have the backing and quilting completed, but I had to order the fabric for the backing. I promise you’ll see lots of pictures on my Instagram as soon as it is all finished!Sewing Room challenge - Busy Momma, Busy Baby Playmat


    That’s a wrap!

    Whew! Did you get all of that?

    It has been a really busy 60 days. I think the hardest part of this challenge was taking on two large projects at once. It required so much of my attention and my time. I also had to fight and resist the urge to continue to plan new projects while working on these. I didn’t go fabric shopping except for once… unheard of if you know me well. I had to stay away and know my limits! Let me tell you, I had quilt shop withdrawals several times.

    Did I get every project completed and quilted? no… but in my eyes, that was a bonus task that I set from the beginning if time allowed.

    I’m so pleased with how these quilts turned out that I can’t wait to finish them and spend a few nights on the couch all curled up with my new quilts to break them in!

    If you joined me in this challenge, send me your pictures! I want to see how your challenge ended and the beautiful projects you checked off your list!

    Thanks for making it all the way down here! If you ever have any questions about quilting or sewing, please feel free to contact me. I’m happy to help.

    Happy Sewing,

    –Christen

  • Easy Way To Add Length To A Bag Strap (& make it cute!)

    Hey there! Today we’re going to talk about this super quick and easy project I did over the weekend. It’s so simple, but I am so pleased with the results that I just had to share it with you! I even remembered to take pictures along the way to create a tutorial. (yay me!) Here is the easy way to add length to a bag strap (and make it cute too!)

    This process should take you no longer than 30 minutes. It could even take you 10 minutes if you have a little bit of previous sewing under your belt. It is a super easy and fun way to customize your bag!

    Just FYI, this post may contain affiliate links to products. If you purchase a product that I recommend, I will get a small commision on the sale at no extra cost to you. This just helps me keep my site up and running and I appreciate your support!

    So let’s start with the bag.

    I’m at the point in my mommy-hood journey where I don’t have to carry a diaper bag anymore. (can I get an amen?) I don’t even have to bring a backpack full of other people’s junk when we travel either. It is glorious, I tell you… but I still am the go-to if there is a need for any essentials when we travel (band-aids, sunscreen, chapstick, Advil, etc.)

    I also love photography and am totally that girl that will be so in the zone that I wouldn’t be surprised if someone swiped my purse while I wasn’t looking. We have several trips coming up this year. (including one to Europe! squeeee!!)

    I’ve been on the lookout for a simple crossbody bag that will let me be totally hands-free and still keep the essentials. Thus, here we are full circle with me and a new bag I bought online. I found a no-frills, bag that didn’t draw a ton of attention and had all I was looking for.

    Simple, but did its job.

    My bubble burst when it came in the mail, and the strap was shorter than I wanted it to be. Bummer, right? — (Side note for the few curious: I am a bit on the “few extra pounds to love” body size, and I’m not an A cup in bra size. You don’t need to know any more details than that!… Strap length is a common issue in crossbody bags for me)

    After giving it about 10 seconds of thought, I decided to put on my thinking cap and just doctor it up myself. I can fix this…

    And I wouldn’t be writing this post if I wasn’t successful so… Tada! I’m not re-inventing the wheel here. Just jazzing it up a bit and adding a bit of color to it. 🙂

    how to make a bag strap longer

    Easy Way To Add Length To A Bag Strap

    What you need

    Fabric – The materials came out of my scrap fabric because what I used was so minimal. As you can see in the picture above, the strap is a thick woven material. I didn’t want my length addition to be flimsy or to wear any differently.

    I chose two different fabrics to add to the sturdiness of my strap addition. The flowered fabric is a simple cotton fabric. The navy shell fabric is more of a canvas texture. Again, these were just scraps. You could get away with both cotton fabrics if you like.

    Measurements – To figure out your specific measurements… measure the width of your strap that you’re adding to. Double that width and then add 1/2″. (don’t freak out – It’s math. I know. My free spirit heart sinks when someone tells me I have to adhere to mathematics standards)

    Example. My strap is 1.25″ wide… so 1.25″ + 1.25″ +.5″ = 3″ width

    For my straps, I cut a  3″x13″ piece from each fabric. (You may choose your length size differently based on your needs. If you only need to add 8″ ish, cut about an 11″ long piece. Make it longer as needed.) The rest of the tutorial is the same no matter what length or width of your strap is. (glad you made it through the math part!)

    Hardware – I ended up deciding against it, but you may want to embellish a little with some shiny hardware! Ain’t no one trying to discourage your style! I went through a Hobby Lobby and took a look at the potential hardware in every finish you could imagine… Have fun with it!

    how to make a bag strap longer

    how to make a bag strap longer

    How to do it

    1. Take one of your fabric pieces and fold it in half lengthwise, right sides of the fabric together. (hot dog style for those that need a little grade school flashback) Stitch all the way down with a 1/4″ seam.

    Do the same to your other piece of fabric. You’ll have a long tube with the pretty part of the material on the inside.

    how to make a bag strap longer

    2. Next, You’ll need a way to turn your fabric right side out. I find this little tool thingy really handy in quite a few more situations than you would think. You can get one here if you want to have one on hand too. (You can also do this with a safety pin tied to a piece of string as well. It is just not as stiff so you have to work it through with your fingers a bit more.)

    how to make a bag strap longer

    Push the hook end part all the way through your fabric tube length-wise and use the hook to latch on to the very end of your fabric. You’ll have to pierce through the fabric to get a good grip.

    Once it is secure, put one of your fingers through the loop on the other end and pull the pole through your fabric tube. It may take a bit of working with it the first few times you do it, but you’ll end up turning the fabric inside out on itself as shown in the picture below.

    Do this for both fabric pieces.

    how to make a bag strap longer

    3. Press/Iron your strap fabric to be nice and flat.

    Check that they match up to the width of your existing strap.

    Sewing the fabric into the ‘tube’ is going to make for a much sturdier strap because now you have four layers of fabric vs. 2. They also won’t want to curl up as you get more wear out of them.

    4. Place the two pieces on top of each other making sure they align all the way down and pin in place so they won’t budge when you stitch them together.

    Time to assemble!

    5. I did a seam at 1/4″ in and another at 3/8″ in, down the length of both sides (again, I want this to be sturdy and wear well when we travel so I’m doubling up. I don’t know what type of trip accident I’m preparing for, but I believe I will be covered if I do the double stitching, right?)

    This is important – Leave about 2-3″ inches open at the top and the bottom so you can attach it to your existing strap! See the image below.

    how to make a bag strap longer

    6. Snip snip – Choose the place where you are going to cut your strap. There is no going back after you make that cut. Make it neat, make it straight and choose carefully. One side of my bag has an adjustable strap already set up; I decided to leave that alone and add my fabric strap to the other side. Strategic? Maybe… Lazy? Most definitely.

    7. Attaching your strap – This is easier explained with the image below, but you’re going to make your strap sandwich now. Take the two ends that you left open and fold them in, so no raw seams or edges are sticking out.

    Slide the cut end of your strap in the middle. It’s the meat of your strap sandwich.

    how to make a bag strap longer

    8. Secure/Sew – You can pin things in place here if it makes you feel more comfortable, but I found the area too tight of a space to work with pins. Also, the fabric is many many layers thick, and that made pins difficult. A wider strap might lend itself to pins, however.

    I got things where I wanted them to be and held it really tightly while I fed the fabric through the sewing machine. It didn’t move around or budge.

    I chose to continue with the 1/4″ and 3/8″ stitch lines for continuity and added a few horizontal lines to make it extra secure. (yes, I’m aware one of my lines got wonky. My primary goal was security not for it to be judged by the quilt police. Make yours as perfect as you like.)

    Do this to both sides of the cut strap. (Be careful that nothing is twisted wrong, that would be an embarrassing mistake.)

    9. The final test – work it! Try on your new bag with fashionable strap and pat yourself on the back. Who says you can’t have function and flair? Usefulness and beauty?


    Yay! Thanks for making it all the way down to the bottom of this quick tutorial. If you have any questions, you can contact me or leave me a comment at the bottom here. I’m happy to help and love to chat.

    If you added a little flair to your bags, I would love to see! Tag me in #iseestarsquilting or on Instagram @iseestarsquilting so I can see 🙂

    Until next time, happy sewing sweet friends!


  • Sewing Room Challenge!

    Sewing Room Challenge

    Ok, So I’m going to put this out there. I’m absolutely drowning in unfinished quilts. You obviously don’t HAVE to join me… but this is where I am right now and I NEED a sewing room challenge! Do you want details? Keep reading, I would love to have someone else join me on this!

    I’m a bit of a hyper squirrel when it comes to quilting. (that’s actually a really good description if I do say so myself) I love quilts. I love love love quilts. And I love fabric. And I love quilt design too.

    When I find new fabric, I immediately plan a whole quilt around it and I want to buy all the coordinating fabric and my heart takes over and doesn’t listen to my brain screaming that I have like 5 (ok, 8) other quilts at home that are not finished yet… For example, I had to buy a little more of the kona solid white fabric for my #atomicstarquilt on fabric.com and I don’t know… this panda fabric just begged to be bought and now I am apparently making a panda quilt (eventually).

    Panda Fabric - Sewing Room Challenge

    Note: The top fabric is by Riley Blake Designs and the bottom Fabric is by Katarina Roccella. You can read the Fave Fabric Friday Post that I wrote about Katarina Roccella.

    I know other quilters who have way more unfinished projects than I have at this moment. Have you seen the hashtag #WIP? It’s “work in progress”… so I know if there’s a hashtag for it, it must be a thing other people struggle with too. I just feel that I have reached a point, personally, where I can’t just laugh it off anymore. It’s becoming a real problem.

    When I was first starting out, my patterns were simple and didn’t require a ton of time to finish. Now, I’ve upped my skills to patterns that scare me just a little because I constantly want to grow as a quilter.

    If your dreams don’t scare you just a little bit… you aren’t dreaming big enough! – words to live by.

    Some of the projects I’ve got in my sewing room right now… They totally are a product of me really living that ‘dream big‘ philosophy… and woah, are they’re taking a lot longer than I originally planned.  The hyper squirrel takes over and I blink and then there are more projects around!

    What do I want to do?

    I’m going to do a total project count of finishable projects in my sewing room at this very moment.*

    Then, I’m going to cut off my project list.

    No more new quilts until I’ve finished these.

    None.

    I have to get my mean mommy – no dessert – attitude on.

    This is a promise to myself, with you as my witness.

    Quilts are beautiful and useful, but only if you finish them!

    *Not that this changes things but I’d like to be honest: I say “finishable” because I have a few English Paper Piecing projects that are ongoing and are going to be ginormous in size and workload. That was my intention when I started English Paper Piecing – something I can take with me and continue for a long long time.

    Ok…… drumroll…

    Right now, I have 3 quilt tops that are started. I have 4 others that are just stacks of fabric that are planned quilts, but not yet cut.

    If you’ve been reading with me for a while, you know I’m not just floating around sipping on tea and quilting all day long. I’m a super busy mom and at times a hot mess of stress. (aren’t we all? …right? Someone please comment and give me a high five?)

    I have 2 kids. I’m a wife, a cook, a maid, chauffeur boo-boo kisser and apparently, I am against sleep of any form too.

    I have enough things on my to-do list without adding any more projects.

    It’s time to finish some and cross off those to-do lists!

    How I’m going to do it?

    Heres my plan… Things with work are incredibly busy right now for me. It’s just insane... (FYI, when I am not quilting, or thinking about quilting, or being a mom… I’m a freelance graphic artist with a long list of job titles that somehow equivalate to something of a miracle worker/people pleaser at the same time) so finding more hours in the day to quilt is just not even on the radar.

    For the month of May & June, I’m going to work on finishing the 3 projects that I have in progress. Finish… yikes. And completely refrain from touching the other 4 that I have a rough plan for but have yet to touch.

    2 months to finish my goal seems a bit long, but these are big projects. Ideally, I would like to finish all the quilt tops in 6 weeks and spend the last 2 weeks quilting.

    Silly me decided that one of my quilts HAS to be hand stitched and now I can’t back out of that deal. It is going to be amazing.

    I have to say just putting this out there has a weight lifted off my shoulders. I have a deadline and a plan.

    Let’s Do This!


    UPDATE: It’s complete! I created a detailed post (with lots of pictures!) alllllll about the Sewing Room Challenge process and see the results.

    You can read that here. Part 2 – The sewing room Challenge Results


    Enough about me… what about you? Do you have unfinished quilts that could use a deadline to get your booty into gear? Even if it is just 1 project hanging over your head, let’s do this together!

    Tell me about your projects in the comments and if you care to join me in this challenge.


  • Riley Blake Challenge Quilt

    Riley Blake Challenge share time!

    Hey there! Bonus post for the week!

    I wanted to share some quick pictures of a project that I’ve had to keep secret for a little while… unless you follow me on Instagram, because I couldn’t help myself and I did share a few sneak peeks of the the quilt in progress over there.

    Riley Blake Challenge 2018

    Image from The Modern Quilt Guild Community

    The Spring 2018 Riley Blake Contest

    Hosted by the Modern Quilt Guild.

    I was sent one fat eighth of each piece from Riley Blake’s new line of fabric with the only instructions being “make something quilted using only Riley Blake fabric”. That is it.

    Complete creative freedom? I’m in.

    After narrowing down all the possibilities, triangles stood out to me… Why? Mostly because I think I often shy away from them. I’m a chicken. I am a perfectionist at heart and triangles seem to demand a lot of perfection. I feel situations like that set me up for disappointment if I can’t get it juuuust right.

    So… I should choose squares or something that is less intimidating, right? Something that I’m more comfortable with? ….. wrong, you don’t know me very well if that is what you thought I would do, silly 🙂

    No, no… I decided to make the whole quilt triangles, and then add in more triangles to that! My plan was then to obsess over it a little more after that.

    Let me just say… it wasn’t so bad. At least not like I thought it was going to be. If you’re afraid of triangles, just do it already. Its a common fear among beginners (and people who just choose to steer clear of them). Is my work perfection? No. Is most everyone else going to notice? Again, no.

    I wrote a blog on stepping out of your comfort zone and this quilt challenge was one of those moments for me.

    Diamonds are a Girl's best friend - Riley Blake Challenge 2018

    About the Quilt

    I *love* the colors of this quilt. Navy is totally my jam. (Do people say that anymore?… jam? Whatever… I’m a mom. I’m allowed to say things way past when they’ve gone out of style)

    The mixing of the Navy with the crisp white is such a timeless combination. Add in the rose gold and…. well well well, we have ourselves a rather classy set of quilting fabric!

    I also chose the aqua fabric as an accent fabric to bring in a little fun and not make it feel so structured – A little crazy to the ‘elite’ party, if you will. 🙂

    Diamonds are a Girl's best friend - Riley Blake Challenge 2018

    I think my favorite part is the little strip of aqua in the piping with the quilt binding! Isn’t it fun?

    The pattern for the quilt was not planned out in advance. I live on the wild side. Because there was no specific size requirements for this competition, I cut out as many triangles as I could from the fat eights and then supplemented in more coordinating Riley Blake Fabric to add volume and size to the over all piece.

    Diamonds are a Girl's best friend - Riley Blake Challenge 2018

    Diamonds are a Girl's best friend - Riley Blake Challenge 2018

    “Diamonds Are A Girl’s Best Friend”

    The name of the quilt piece is more of an allude to the quilting decisions that I made more than the shape of the pieces.

    I may have used triangles all over the quilt, but it doesn’t mean that me and triangles are exactly besties (yet?). I’m pretty sure there will always be a bit of a riff between us.

    I feel like I conquered triangles a bit through this quilt and even though I could use some tweaking (like, so much) to obtain perfection… overall, I am really happy with how it turned out. I’m not a big fat chicken afraid of triangles anymore.

    I’m not certain when they will announce the winner of the competition. Sometime in May. A quick google search didn’t reveal a concrete date. Once the final quilt has been chosen, it will go on display behind the Riley Blake Booth at Spring Quilt Market. Absolute fame without the fortune 🙂 .. still, an incredible honor.

    My hopes are up but not sky high. I’ve taken a peek at a few fellow competitor quilters on Instagram ( #mqgfabricchallenge and #rileyblakedesigns) and… you people and your creations are nothing short of amazing! There is such talent in this world!

    If my quilt entry wins, I’m positive you’ll know about it because I’ll never ever shut up about it. But win or lose, I really enjoyed being a part of the whole experience. I call that a win 🙂

    Subscribe for coupons, giveaways, & the latest news!

    We have fun here… join us, won’t you?


  • 100 Modern Blocks – A Book Review

    100 Modern Blocks – A book Review

    As a busy momma (and wife and all the other hats we wear as adults) I’m always on the lookout for quick and easy projects. Projects that I can work on in small chunks of time and will not take over my office space for 6 months.

    You know those projects? While I may have a few hours today to work on a quilt, I may not get another break to work on it until next week.

    I am an avid stalker of “quilt top in 1 hour” patterns and “quilt in a weekend” projects. (Side Note: I have an easy quilt pattern that fits just that description! Click here)

    Those quickies great if you just want to get something done but I think you miss out on refining your skills with the easy/quick stuff. If you do have the time, a more complex pattern is a challenge for your mind, your skills and your patience in some cases!

    I’ve found a way to mix both simple and complex… Sound too good to be true? ha… maybe in the world of physics, but not for the world of quilting… yee of little faith! I never disappoint when I make a promise, don’t you know?

    So have you seen the book “100 Modern Quilting Blocks” or “City Sampler” and wondered what the deal was? Is it worth it? I’m here to tell you that it totally is!

    The above image is from http://www.Tulapink.com

    First of all… It’s Tula Pink. I mean that right there should tell you that you’re in for something pretty awesome. If you are not familiar with Tula Pink…. allow me to introduce you to a world of so much magic and splendor you’ll be smiling for days! I mean how can you not be so excitedly happy looking at this picture? It’s amazing.

    If you’re tired of spinning your wheels without feeling like you’re getting anywhere with quilting… check out her book. Just like the title says, the book consists of 100 Modern quilt blocks. It lays out everything you need to make each one and superb instructions. (side note: don’t just dump all your cut pieces into one pile and assume you’ll be able to sort them out later. Just trust me on this one…)

    Each of these bite-sized block projects can be completed in a short amount of time. It depends on your sewing skills but I usually take roughly about an hour from cutting to completion. Easy peasy and totally feel fulfilled at the end! Some are simple while others are more complex. But when all of them combine….. wowza! what a lovely large quilt!

    You can either start with a big dreamy vision or you can just work with one block at a time. It’s is perfect for those nights when you just want to declutter your scaps.

    And this has nothing to do with the quilting templates but as an avid writer myself, I feel as though this book is like reading a conversation journal from a dear friend. She’s speaking to me, asking my opinion and encouraging me to go on this quilting journey with her. She encourages writing in the margins, crossing out blocks you don’t like and making notes.

    “This is your quilt”.

    She encourages doing whatever you feel like. Make 100 of the same block? You go for it. Do something entirely different with the 100 blocks in the end? Yep.

    From the first page introduction: “Tula Pink’s city sampler is a collaboration between you and me. I am the platform and you are the speaker, so stand on my shoulders and tell the future who you are and why you make.”

    *Sigh* is she not just the greatest? I love this quote.

    If you decide to buy the book (and you totally should… or ask for it for your birthday… or Mothers Day or Christmas or because its Tuesday or whatever) You can get the book on Amazon here!

    *This post contains affiliate links. That just means that if you buy a product using a link on my site, I get a very small commission of the sale at NO extra cost to you. Thank you for helping me keep my site up and running and so we can continue to share a wonderful quilting community!*