Tutorials

Step by step tutorials for quilting and sewing projects from ISeeStarsQuilting.

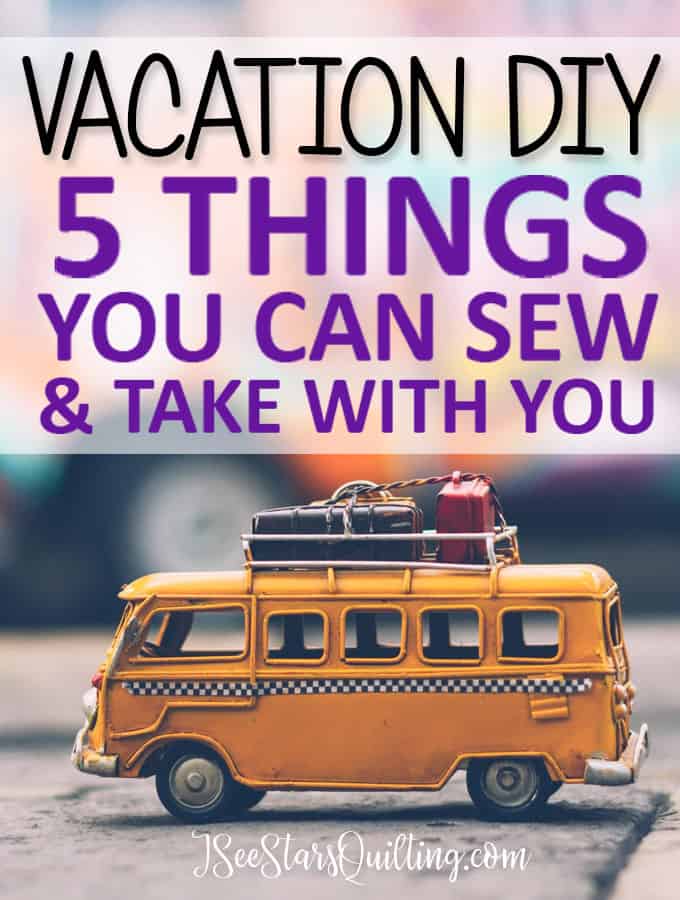
  • 5 things To Sew For Vacation!

    Do you have a get-away planned in the future? Looking to take a long a few handmade items on your trip? Here are my favorite top 5 Things To Sew For Vacation!

    Vacations are the best….

    ISeeStarsQuilting

    One of my favorite things to do before vacation is to procrastinate packing… anyone else with me, mommas?

    Oh, I’ve got it all figured out in my head. I’ve done the laundry and have a semi-system of piles ready to go in the suitcase. But I will find other things to do to prep for our vacation besides actually packing… for example, creating fun sewing projects that will be useful while on vacation!

    What a great idea, right?

    5 Sewing Projects For Vacation

    1.Catch-all Fabric Bins – I love making these little bins because they’re fun. They’re easy and they are useful in so many ways. Use up those pretty scraps, Be creative, go crazy with that fun fabric you couldn’t live without! These were a sanity saver in the hotel bathroom as well as in the hotel room. Everyone in my family has a bin and they know to keep the things that are important to them in the bin so it doesn’t get left behind. This comes together really easily and does not require a lot of skill or sewing magic! You can get the full tutorial here – The Perfect Easy Catch the Mess Fabric Bin

    They also fold down to almost nothing in your suitcase. Bonus!

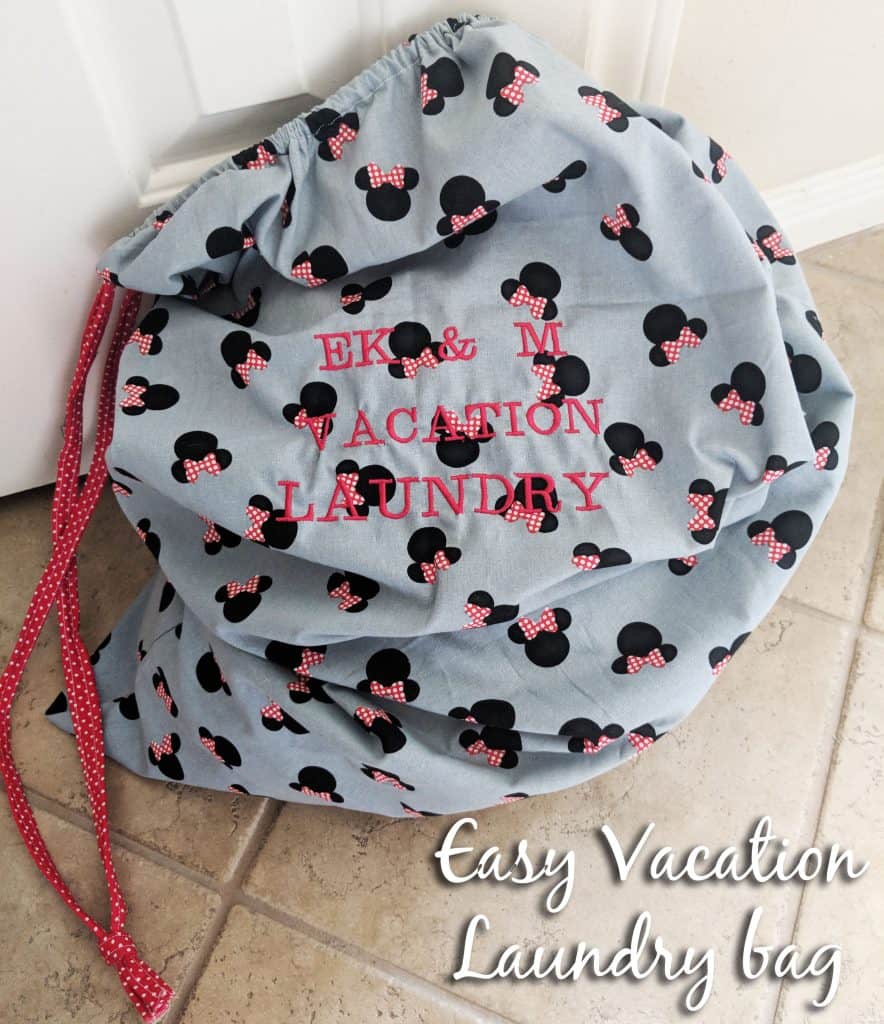
    2. Dirty Laundry bag – This was the easiest and absolutely most helpful thing to have on vacation when you’re traveling with a family!

    This darling vacation Laundry bag will take no more than 15 minutes of your time and will be a Sanity saver on your trips!

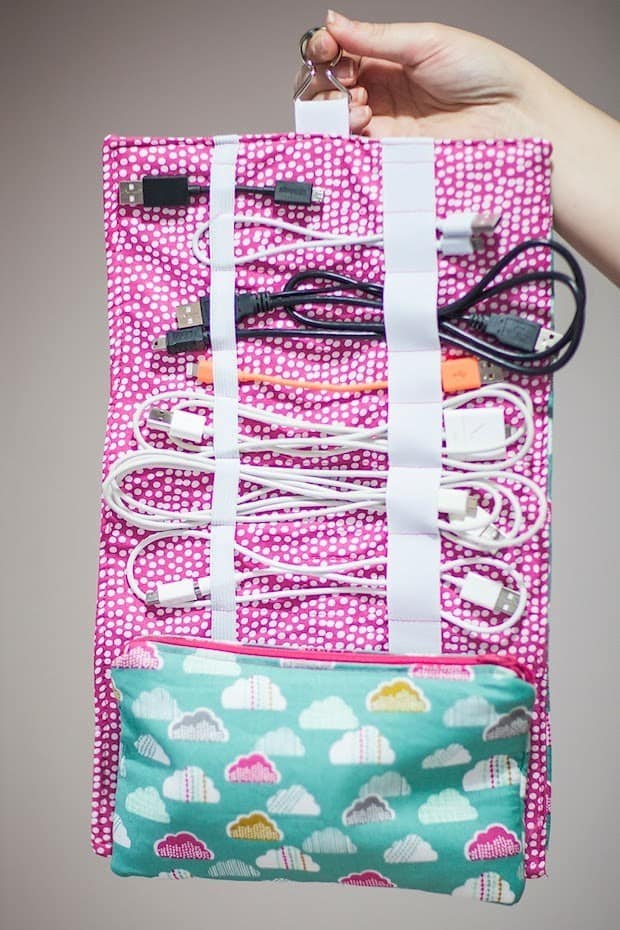
    3. Does everything have to come with its own separate charging cord?! The girls at Live It, Love IT, Make It found a great solution to manage the mishap of crazy cords when traveling!

    I could even use thing around the house come to think of it. Perhaps I should make up a few more after I write this post 😉

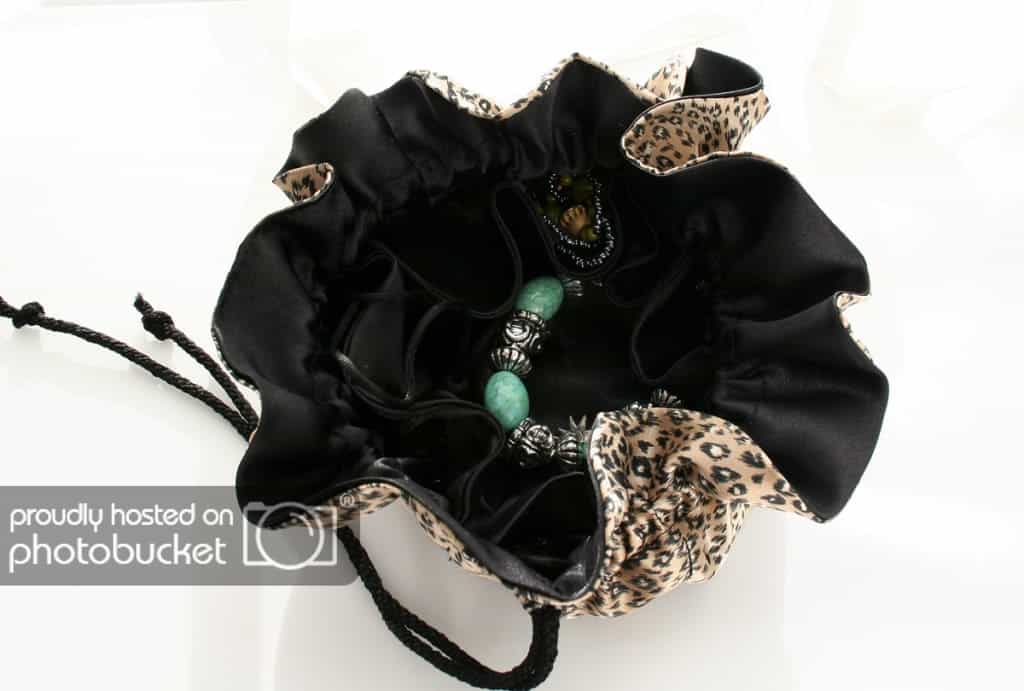
    4. Jewelry organizer that is really pretty? Yes, Please. And Thank You. I love this little pouch. I’ve made several over the years as gifts for friends too. They work really good to hold your essential oils too!

    If you are vacationing with kids, do not leave home without your lavender! 🙂

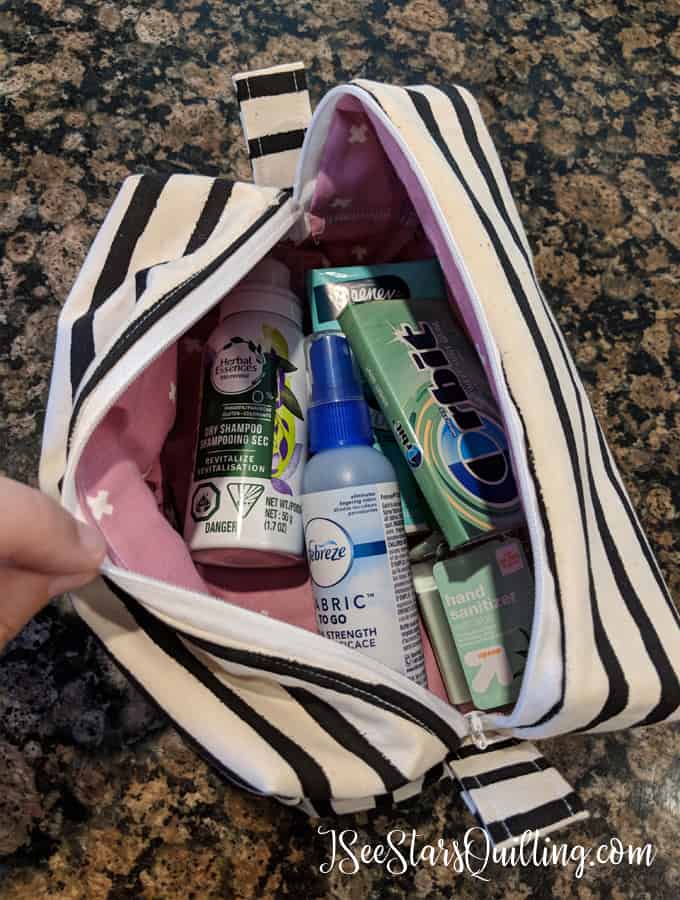
    5. Zipper Box Pouch – This sews up in about an hour. I promise you can make these! Its the perfect cosmetic pouch, organizer for little small toys, snacks, game pieces on a long car ride… we’ve used it for everything you can imagine!

    DIY TLC Teacher Kit - This Zipper Box tote comes together in less than an hour! Fill it with goodies and take care of your teachers #teachergift #ZipperBoxtote #easygift

    There you have it! These are my go-to vacation accessories!

    If you’re a DIY-er, don’t leave town without something handmade close to you!

    Also, if you are procrastinating your packing… don’t try and do all of these in one day and then stay up all night packing because you were sewing and then blame it on me, ok? – I mean, thats exactly what I would do, but I am warning you so you can know better!

    Happy sewing and safe travels!

  • What is a Walking Foot?

    Walking Foot

    What the what? Yes, a walking foot (also known as an even-feed foot). I’ve had questions about this tool before. Why I use it and if it is truly a necessity for beginner level quilters. Here is a bit long, tell it all, post on the Walking Foot.

    Answers to your Walking Foot Questions

    Is it a standard sewing foot? – No, your sewing machine (most of the time) does not come with this attachment.

    Do you REALLY NEED it? – I honestly did not start out with one. I used the same sewing foot on everything (yes, everything. I’ve moved on, thankfully. Being self-taught has its drawbacks, ok?) It wasn’t until I was struggling with more advanced quilting techniques that I upgraded to a walking foot and man… It was like night and day. I’m not going to say that I’m not dramatic or anything but I swear I could hear the angels sing. ‘So this is why people enjoy quilting’… If you’re serious about quilting, I highly suggest looking into getting one. It will be the grease to your quilting gears.

    Walking Foot

    How much does it cost? – It is more expensive than most of the sewing feet but you can find one for anywhere between $10-$70 depending on brand and where you buy from.

    Some walking feet are brand specific models designed for you machine. There are also generic one-size-fits-most models. As you can guess, generic is a little cheaper.

    There are a few on Amazon for around $8. I personally have not tried those and can not either recommend or not recommend those products. I suggest going with a middle of the range tool unless you’re just curious for a bargain. Sometimes you really do get what you pay for and I would never ever steer you towards something that could be a waste of your money.

    These are a few models I have personally used and DO recommend:

    Singer Walking Foot


    Singer Even Feed Walking Presser Foor for Quilters – $22.79


    Janome Walking Foot

    Janome Even Feed Foot (Open Toe) – $59.99


    What does a walking foot do? – A walking foot makes sewing thick layers easier because of the presser foot on top of your fabric moves (or walks) too. It moves with the feed dogs underneath. In theory, this means that the top layer will move at the same speed as the bottom and middle layers.

    Sewing Machine Feed Dogs


    How do you put on the walking foot? – It is a little different than your regular sewing feet. It takes a little practice, but if it wasn’t worth it, I wouldn’t bother with it myself. It’s totally worth it, trust me. There is a little bar that fits over (or on) the needle tightening screw. You’ll know if you don’t put it on the right way because your machine will make a terrible noise when you go to sew but rest assured because once you install it right, you’ll know what to look for!

    Here are some close-ups of the walking foot on my machine and what to look for when you put yours on.

    Walking Foot Walking Foot

    When do you use the walking foot? – It is a must-have accessory for straight line quilting. It keeps the layers together and prevents the top layer from getting pushed ahead of the middle and bottom layers. This prevents puckering and tiny pleats from occurring when you change the direction of your quilted lines. I use the walking foot whenever I am straight line quilting, which is what most beginner quilters will be using.

    You can also use it when sewing on your quilt binding. It will keep the top layer of the binding from shifting ahead of the bottom layer. Essentials, you’ll want to use your walking foot whenever you are sewing multiple layers and feel like the layers are not moving at the same speed. Your walking foot will solve that problem.

    Do you have a walking foot yet? What is your opinion? Do you just love yours? Did you notice a huge difference when you switched to a walking foot for quilting like I did? Let me know your thoughts in the comments. I would love to hear from you!

    This post uses affiliate links. I wouldn’t recommend products that I didn’t own and love. If you make a purchase using my links, I get a small commission at no extra cost to you. Thank you for allowing me to continue to provide you with patterns and tutorials!

  • How to master the quarter inch seam

    Mastering the Quarter Inch Seam

    The quarter inch seam. One of the most tedious techniques to master in quilting. I can’t stress enough what a difference it makes when your seam allowances are consistent and your pieces are precisely trimmed! That alone can make the difference of a professional looking quilt vs. an amateur.

    Why is it Important to Sew an Accurate Quarter Inch Seam?

    All professional quilters use it. Your pieces will line up correctly when your seam allowances are even. If seam allowances are off, pieces will not match-up with each other when it’s time to sew everything together.

    Here are a few helpful tips to help you master the quarter inch seam.

    The QUARTER-INCH FOOT

    Y’all, this was a game changer for me. When I got my new Janome machine, it came with a big collection of sewing feet. My old machine had 1… ONE FOOT and then I purchased the walking foot so I could quilt. I didn’t know what all the others were for… I found that this foot makes your quarter inch seams almost effortless! Most newer machines will come with a quarter inch foot, but many older machines do not. It is worth the investment if you do not have one. You can pick up your own quarter inch foot for under $10 on amazon by clicking here. This is what you’re looking for:

    The quarter-inch foot allows you to line up fabric with the edge of the foot to achieve a quarter-inch seam. See how nice that is in the photo below?

    TAPE YOUR MACHINE

    A quarter-inch foot will help your seam allowances, but if you don’t have one or you can’t get one… no worries, just tape your machine. This is a total cheap and easy fix you can do RIGHT NOW. I use washi tape (because its pretty!). It doesn’t leave any residue when you want to pull it up. You can use whatever you have on hand. Mark from the edge of your machine all the way leading up to the foot. Then just stay in the lines and make sure you are lining up your fabric right. Be meticulous about it!

    With just a little extra effort, your seams will be perfect! The best way to ensure that you have a real quarter inch seam is to measure what you’ve sewn and improved upon it until you’ve got it right. It may be frustrating at first, but pretty soon you’ll be a pro and the quarter inch seam will be second nature to you.

    Want a new pattern to try out your quarter inch seam guidelines on? Click here. You can join my e-mail list and I’ll send you a beautiful quilt pattern for FREE. It is suitable for the beginner and intermediate level quilter and will have you looking so impressive with your sewing skills!

    _______________________________________________________________________________________________

    *This post contains affiliate links. That means that (at no extra cost to you) if you purchase a product that I link on my website, I will receive a small commission of that sale. I would never recommend a product that I do not already own or LOVE 100%.*

  • The (less than) 5 Minute Giant Pin Cushion

    Hey there! We’re going to talk pincushions today: An essential tool in the sewing space. More importantly, a DIY Giant Pin Cushion!

    I have a pin problem. I love them all and it doesn’t matter how many I have, I always seem to run low on the big projects. So then I just NEED to buy more, you know? Tell me you have that problem too so I know I’m not alone. Anyone?

    I’ve tried everything under the sun from little magnets and bowls and bulky little tomatoes. They all work wonderfully… but can I be honest here? They aren’t all that pretty. There I said it. I feel a bit vain, but it’s out there now.

    It was so easy to make my own… and it is oh-so-pretty! Now you can totally make your own custom pincushion too! Get this… I made it in less than 5 minutes – With things I already had. NO sewing required. And it is HUGE. Like, hold all (or most) of my pins, huge.

    5 Minutes? Yeah, and most of that is gathering your pins and putting them on your new cushion. – Bonus, it even has a handle!! This is almost like finding out your favorite dress has pockets!

    The (less than) 5 Minute Pincushion

    Things you’ll need (and you probably already have)
    1 Large scrap of your favorite fabric. A 10-inch square piece of fabric will work
    1 Large Mug – I got mine from the dollar store because it was cute, but any mug will do.
    A ball of spare stuffing that will fill your mug. You could also use quilt batting or even other scrap fabric you have around.

    1. Place your ball of stuffing in the middle of your square of fabric.
    2. Wrap the fabric around it gathering the edges to one side – think like a  party balloon shape.
    3. Put the material in your mug with the smoothest part of the cotton stuffing ball on the top. All the corners and edges go inside the mug. My mug is clear and you can totally see the stuffed fabric on the sides. There is no science to it or wrong way to go about it. Just cram it in there.
    4. Make sure all raw edges of the fabric are inside of your mug.
    5. Boom. Grab all your favorite pins and go for it!

    Enjoy your new pincushion and change the fabric out whenever your heart desires!

    Until next time… xoxo
    Christen

    P.S. – What are some of your favorite simple DIY hacks you have made in the sewing room?

    Note: If you make your very own giant mug pin-cushion, I would love to see it! Tag me so I can see your beautiful new creation! #iseestarsquilting