Patterns + Classes

A collection of free patterns from I See Stars Quilting and offers from other talented quilting artists.

  • Waterfalls Pattern (Another one!)

    I shared pictures last week of my double throw sized Waterfalls Pattern. (If you didn’t catch it, you can read it here Waterfalls Pattern) Today, I’m going to share the pictures from the regular throw sized waterfalls quilt that I recently whipped up to give as a gift to a nephew!

    *static noise* Mission: Create a gift for a 12-year-old boy.

    Let me preface this by saying all I had to go on were his favorite colors. – Blue and Green – I decided to just go with a jelly roll because I happened to find one that was just perfect. (absolute lucky score!)

    Here is the finished quilt – I was feeling spacey on this one.
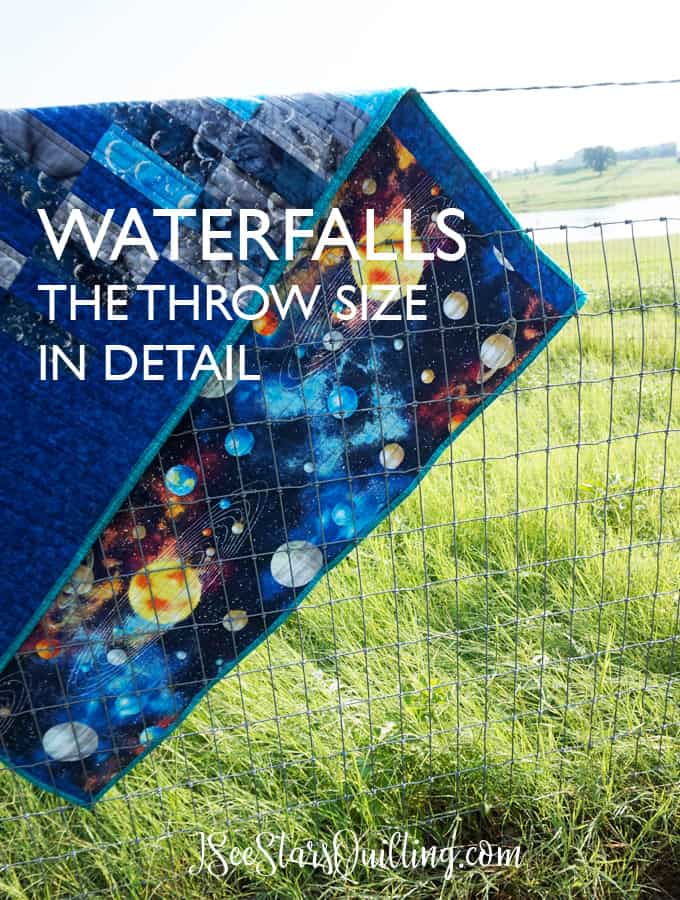
    The backing for the quilt is really soft flannel that I scored for $2.18/yard on a labor day sale at JoAnns Fabric.

    Tangent – Did you know fabric stores celebrate labor day? I didn’t… but I swiped the whole bolt of this because… who doesn’t love a little cosmos in their life?

    This is what I also came home with that day if you’re interested… (yes, those are me cleaning out the whole bolt of fabric, not little bitty stacks) I felt like a kid who just went on a spending spree at the candy store… which I guess I did technically. Or at least, the adult crafty woman version of it.

    Waterfalls Pattern – The throw Version Pictures

    This is a picture of the quilt before it left my house… Very simple straight line quilting, but I love the way it just folds so easily.

    Then I decided to take way better pictures of the quilt once we arrived at my brother-in-law’s house because… just look at the view! This is their backyard! Wow, right? You better believe that the stars shine so bright at night without any city lights around!

    The cosmos backing of the fabric echoes the silver moon shapes on the front of the quilt. Here is a slightly more detailed picture of the front fabric and quilting detail. See the “moon” shapes? They’re a metallic silver print and they shine so pretty!

    One last little thing that I want to make sure everyone takes a second to see. My quilt label! Do you see it in the corner?

    I was having a conversation with some of my quilting girls the other day (several of which are much older and have been quilting longer than I have) and one girl mentioned how there was this really sad trend in the quilting world that was happening.

    There are quilts that have been made by generations before us that have lost their story/meaning. No one knows who made them, or who they were for… what occasion or what family they belong to. There are no labels and the word of mouth stories are being forgotten by family members.

    I’m not going to lie. It broke my heart.

    My greatest passion in making these quilts for my family is because I want them to know how much I love them and even long after I am gone, they will always have this part of me with them.

    I have a quilt that is tattered and torn and well-loved and worn from my great-great-grandmother. I cherish it even though I never had the opportunity to meet her. But in another few generations, I don’t know that her story will pass on. It is a bittersweet pill to swallow.

    Anyways, quilt labels are a post for us to discuss on another day.

    The young man who I made this quilt for was overjoyed and loved snuggling up in it.

    Mission: Complete.


  • 10 FREE Beginner Quilt Patterns That Every Quilter Needs

    You know the nights when you get the itch to sew but you don’t know what project to start next? Which quilt pattern should I use? Should I go with an old favorite or try something new? Do I even dare browse Etsy or Pinterest for something new to work on? What if I end up not liking it or worse, can’t do it? These 10 FREE Beginner Quilt Patterns that Every Quilter Needs is going to save your tail, my sweet sewing friends!

    These patterns are all either 1) I have tried it myself and loved it or 2) I have sewn something else of the designers and I loved his/her style.

    I know these designers. I know their style and the methods and the level of quilting knowledge you need to attempt these yourself. And complete full confidence can recommend them to you!

    Also, If you are in the market for Free Quilt patterns, I’ll send you my own favorite design if you sign up for my e-mail list! No spam or millions of e-mails, pinky promise!


    10 FREE Beginner Quilt Patterns That Every Quilter Needs


    Log Cabin Quilt Pattern

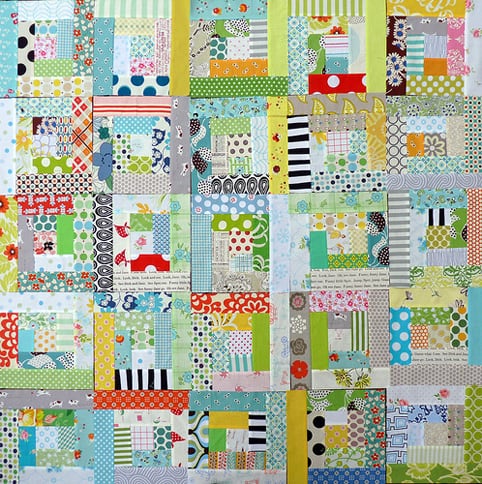
    There are a million different variations out there! I particularly like this version from Red Pepper Quilts because it is a great reminder that not everything has to be meticulously planned and strategically thought out. This one is a good mix of fun scrap fabrics.

    A Log Cabin pattern is made up of small squares and rectangles that get progressively longer as they spiral out to the finished size. It is said that this pattern first originated in the United States after the Civil War began.

    Image from RedPepperQuilts.com

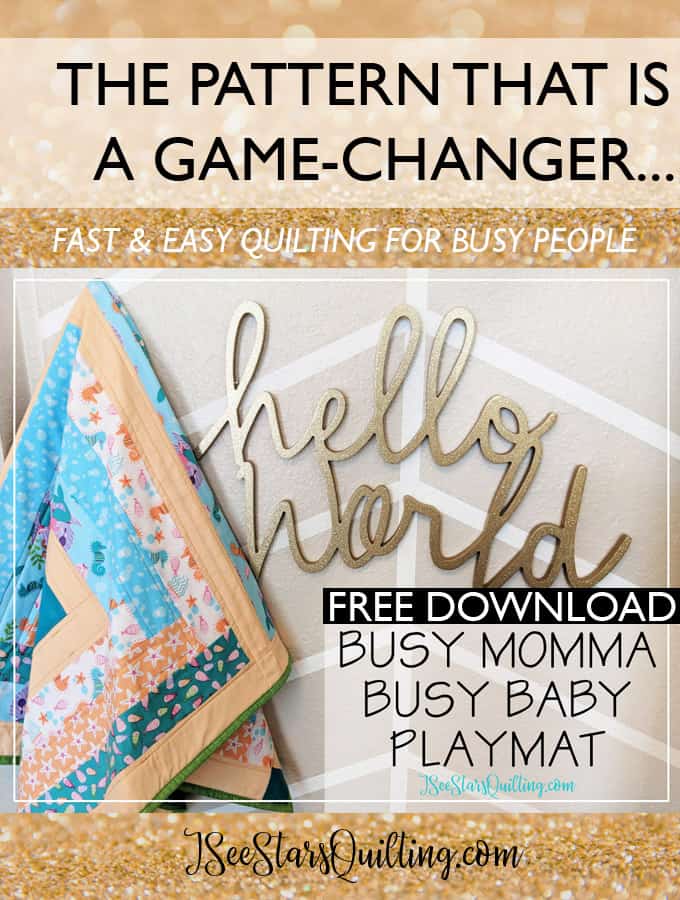
    Here is another version of the Log Cabin Quilts. My Busy Momma, Busy Baby Playmat pattern! Designed using Jelly Rolls, this pattern comes together super fast and easy!

    Think you're too busy to quilt? The Busy Momma Busy Baby Playmat Pattern is game-changer. Seriously beautiful quilt that comes together fast and easy, all level friendly... and it is a FREE DOWNLOAD. Seriously. You don't want to miss this!

    You can download the Busy Momma, Busy Baby Quilt Pattern for FREE here.


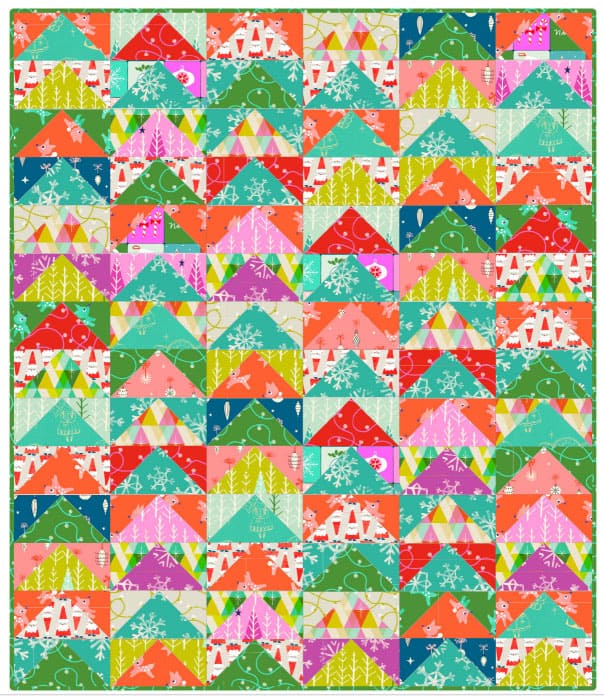
    Garland Quilt Pattern by ALEXIA ABEGG with Cotton + Steel

    This one is easy! I love it so much! It is a really quick one when you want to show off your patterned fabrics too 🙂 You can see the Garland Quilt Pattern Here.

    Image from Garland Quilt Pattern

    Apricot Compote by Carina Gardner

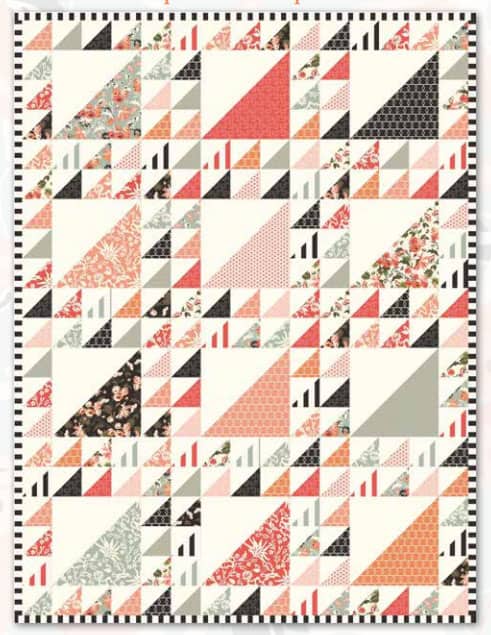
    Do you love half square triangles? Oh, you do?! well well well! how about this beauty! If you are looking for a pattern that is easy and stress-free but you would like to perfect your corner matching. ta-da! I seriously did choose this pattern then I finally realized I could no longer be afraid of triangles and needing my points to match up! It sure is a pretty one that looks less traditional than a lot of HST quilts.

    Download the Apricot Compote here.

    Image from Apricot Compote Pattern

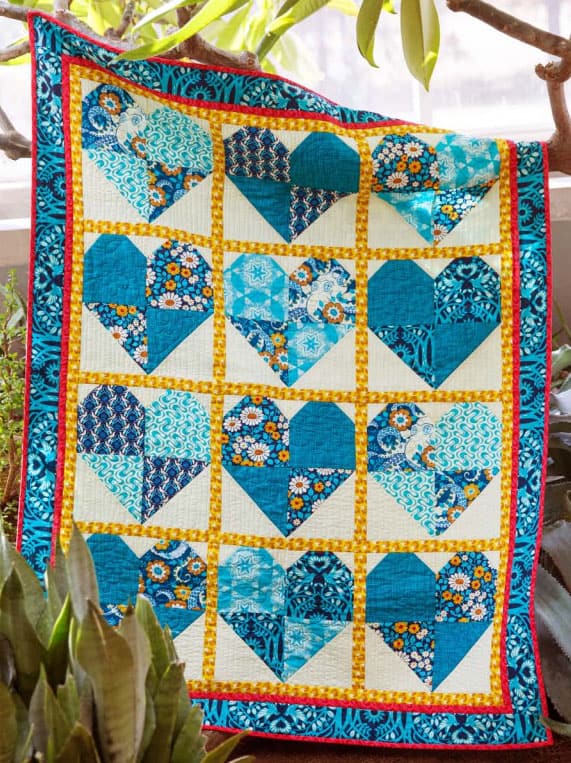
    Hello Love by Heather Bailey

    Note this is not for the novice beginner quilter. The pattern suggests an advanced beginner quilting level.

    How beautiful and full of love is this quilt?! oh, I could see so many possibilities with fabric choices and holiday prints!

    You can get this Free Hello Love Pattern Here.

    Image from Hello Love Pattern

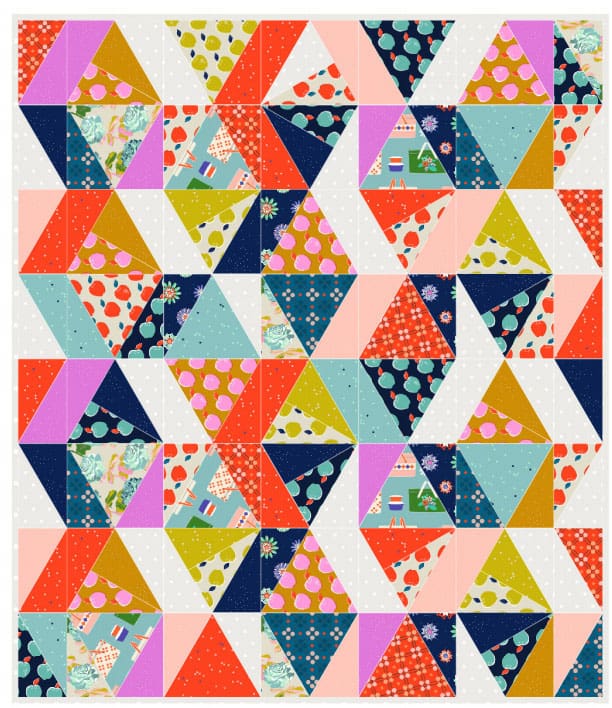
    Picnic Quilt by Melody Miller

    I adore this quilt pattern. It is not near as complicated as it looks with all of those triangle points, I promise. You will be so pleased with yourself at the end of this one!

    You can find the Picnic Quilt Pattern Here.

    Image from Picnic Pattern


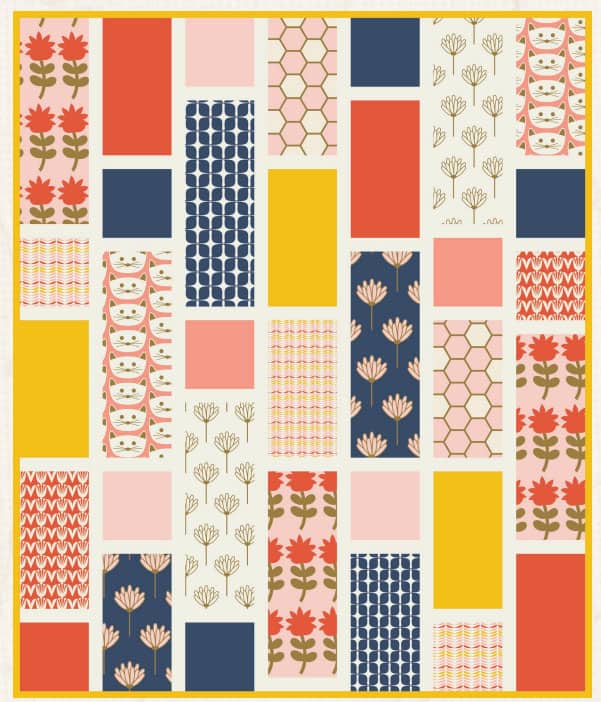
    Blooming Fields by Dana Willard

    Simple. Modern. classy and a beautiful way to show off your favorite fabrics!

    You can find Blooming Fields Pattern Here.

    Image from Blooming Fields Pattern

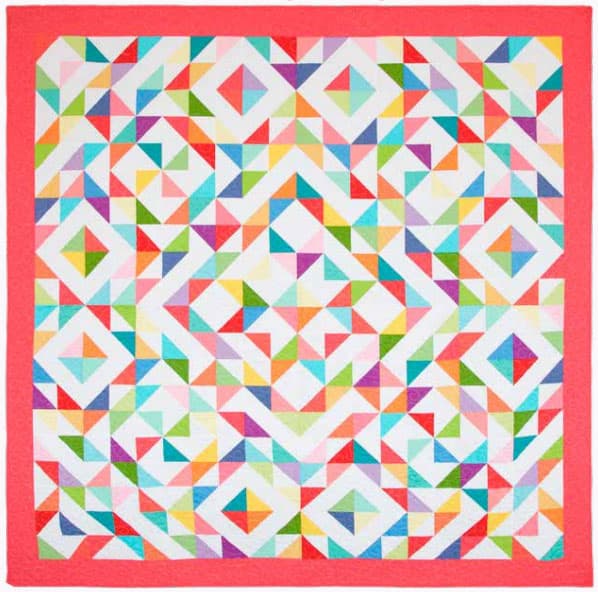
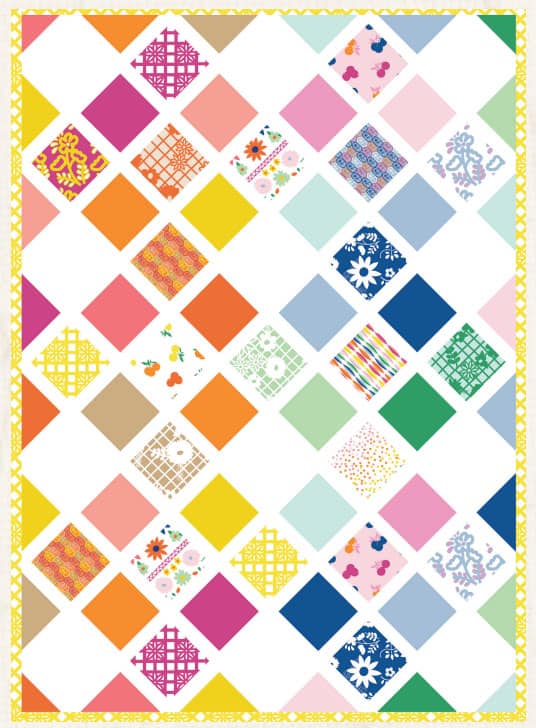
    Rainbow Tiles By Riley Blake

    Half Square Triangles (aka HST) are your friend. Learn to love them because you can create some beautiful patterns with them!

    This Rainbow Tiles Pattern is all sorts of predictable unpredictability. It is fun and fresh and so so simple if you keep your pieces right. I have seen this quilt in a simple monochrome version as well that was absolutely breathtaking!

    Image from Rainbow Tiles Pattern

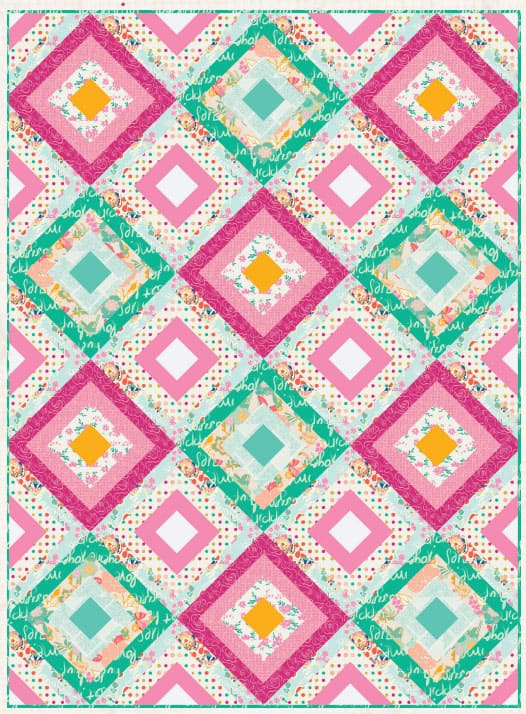
    Sugartown by Art Gallery Fabric Studios

    This quilt may look a little more complicated than you are used to but I assure you it is beginner friendly and so much fun to play with fabrics!

    You can find this Sugartown Pattern here.

    Image from Sugartown Pattern

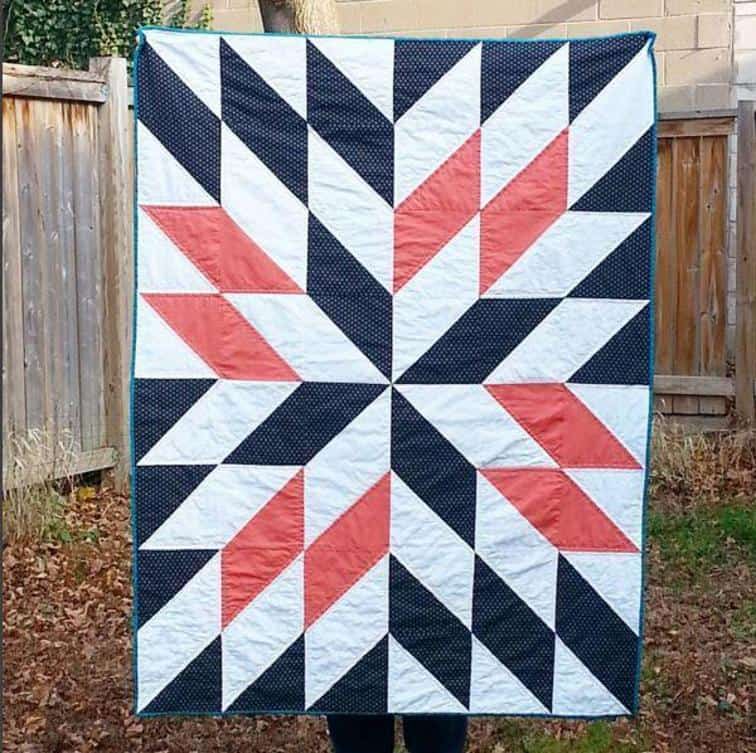
    Star Gazing by Soft Day Quilt Patterns

    This is a link to a Pattern from Craftsy. FYI, you can find tons of other patterns on their site. You can even join a membership program and have full access to learn just about any class you could dream of! I wrote a review on craftsy a little while back. You can click here to read my Craftsy review.

    As for this pattern. It is super simple! and it comes together super fast! Just 3 main fabrics to deal with and a stunning star design as the result? Yes, please!

    Click here to see this Star Gazing Pattern from Soft Day Quilt Patterns

    Image from Craftsy.com

    Fiesta Garden by Dana Willard

    (Another pattern from Dana Willard. I really love her patterns for their clean and crisp designs)

    If Sugartown is still too much out of your comfort zone, you can’t go wrong with Fiesta Garden! Its very simple but still makes for a stunning quilt!

    You can download the free Fiesta Garden Quilt Pattern here.

    Image from Fiesta Garden Pattern4
    This should get you well through most of your quilting projects 🙂 I hope you found this list useful and found some new quilt patterns to add to the workload pile!

    Let me know in the comments if you decide to make any of these or if I missed any of your favorite Freebie quilt patterns!

    Happy Sewing!

    These are the 10 FREE patterns that every quilter needs to have in their arsenal of patterns for when you just want a great pattern that isn't going to make you think really long and hard before quilting. I can't wait to sew each and every one of them! These are the 10 FREE patterns that every quilter needs to have in their arsenal of patterns for when you just want a great pattern that isn't going to make you think really long and hard before quilting. I can't wait to sew each and every one of them!

  • Updates on the Zipper Box Pouch Tutorial

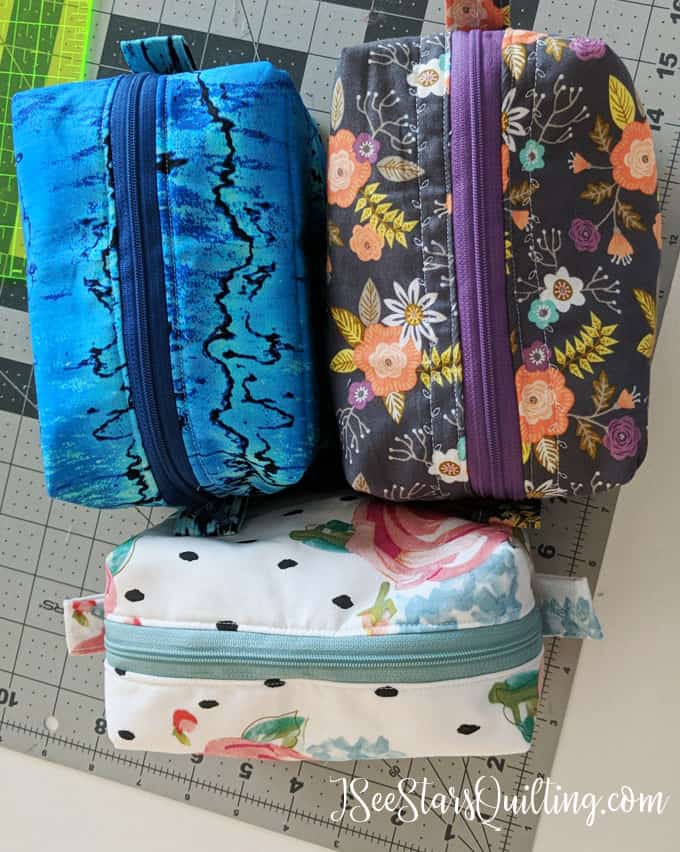
    The other day I was talking to a friend of mine about this zipper box pouch tutorial and how I’ve been making a bunch of them because they are so fast and fun and I’m going through my big scraps like water. It is just perfect, right? And the time to complete each one has gone just under an hour to only 35 minutes each. Yeah, I’ve been making a bunch of them so it goes pretty quick now.

    Easy gifts? Um, yes! (To my Mom: Still act surprised when you get one of these for Christmas ok?)

    This is an alternate finishing technique for the final step of the Zipper Box Tote. It comes together in less than an hour! #ZipperBoxtote #easygift

    You may have caught a sneak peek at some of these in the works on my Instagram account. Instagram my favorite way to share updates on the many projects that I have going on right now. Follow me!

    So as I was saying, I was all proud of the progress I had made… and just when I thought I had everything figured out, she showed me a different way to make the corners of this box pouch. Say what?! Yeah… and it was kind of mindblowing, honestly.

    So I’m adding a quick alternate ending to the tutorial for the zipper box pouch. It was really cool to go about it completely different and still get the same results. I just had to share it with you!

    Check them both out and see which way you prefer!

    (Side note: Both ways work out with exactly the same results… It is just a different technique.)

    If you haven’t read the first part of the tutorial, click here and then come back 🙂 I’ll add a link on that post as well!

    Alternate ending tutorial for the Zipper Box Pouch

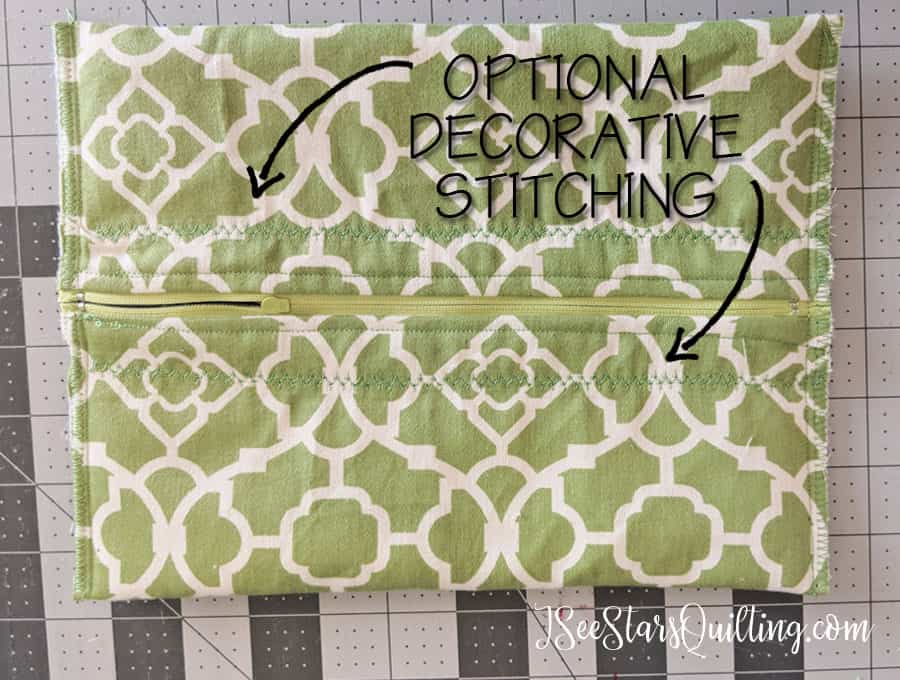
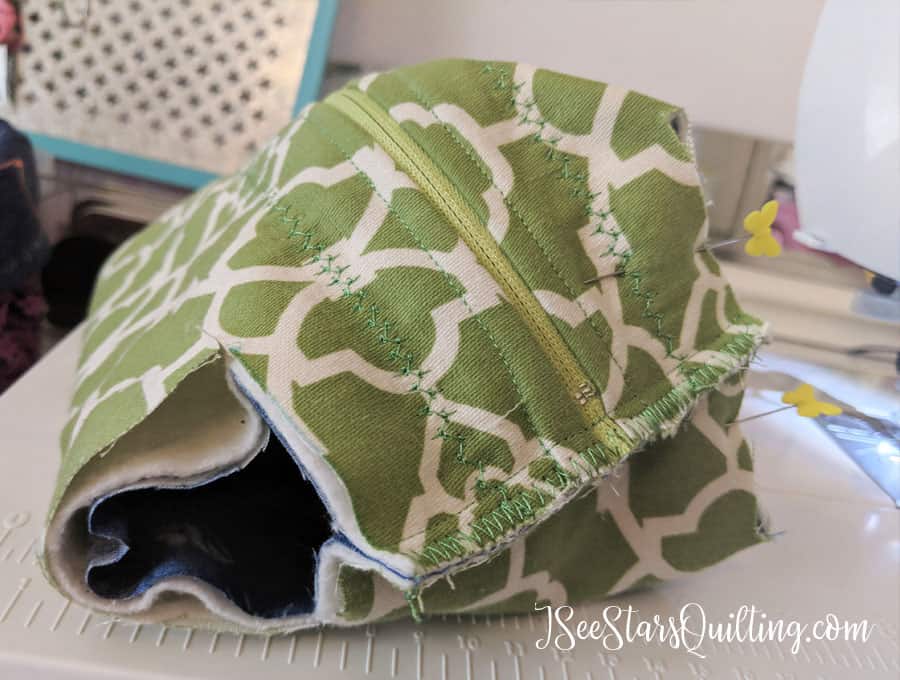
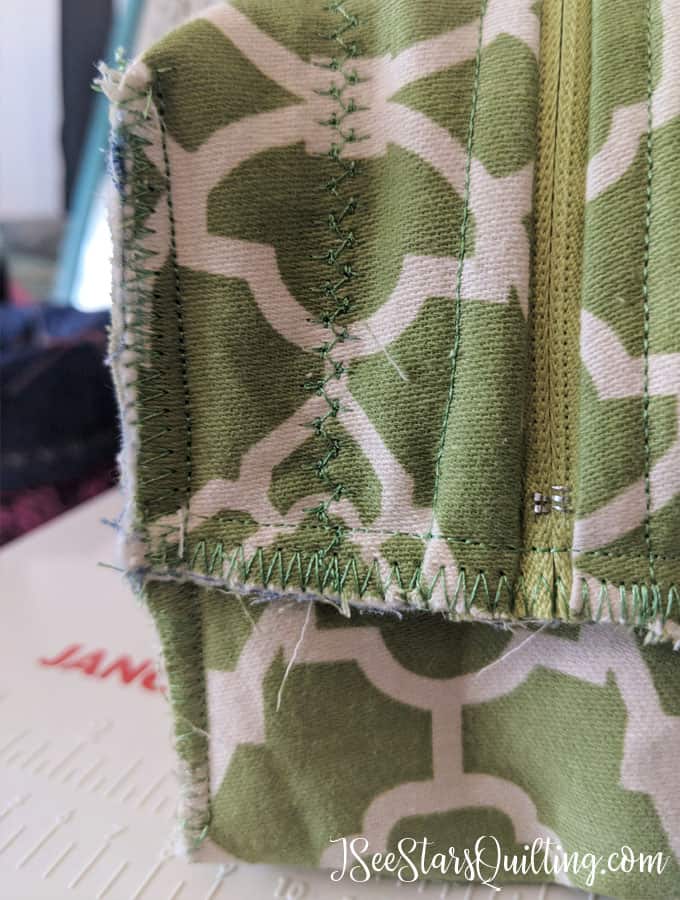
    Ok so where we left off in the other tutorial, you should be looking at a pouch that is flat just like this one, and the sizes are zig-zag stitched just like this one too. Got it? Good!

    This is an alternate finishing technique for the final step of the Zipper Box Tote. It comes together in less than an hour! #ZipperBoxtote #easygift

    Please see my note at the bottom of this post about decorative stitching ideas. It is something new that I started after I made the tutorial

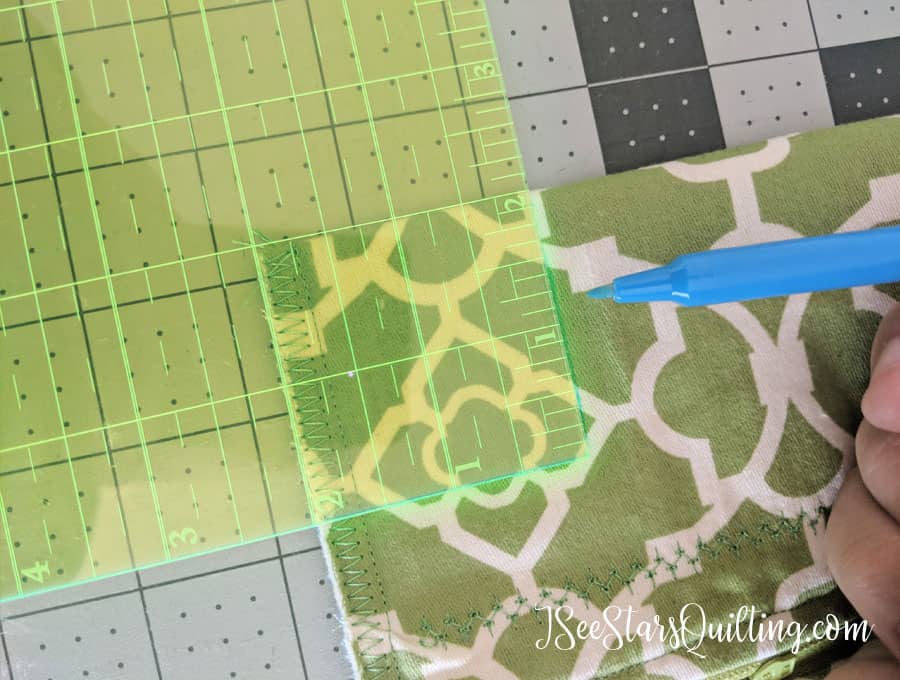
    In the previous tutorial, I had you measure up 2 inches on your folded sides. Take your ruler, fabric marker or light pencil and draw a 2″ square in each corner of your rectangle.

    This is an alternate finishing technique for the final step of the Zipper Box Tote. It comes together in less than an hour! #ZipperBoxtote #easygift

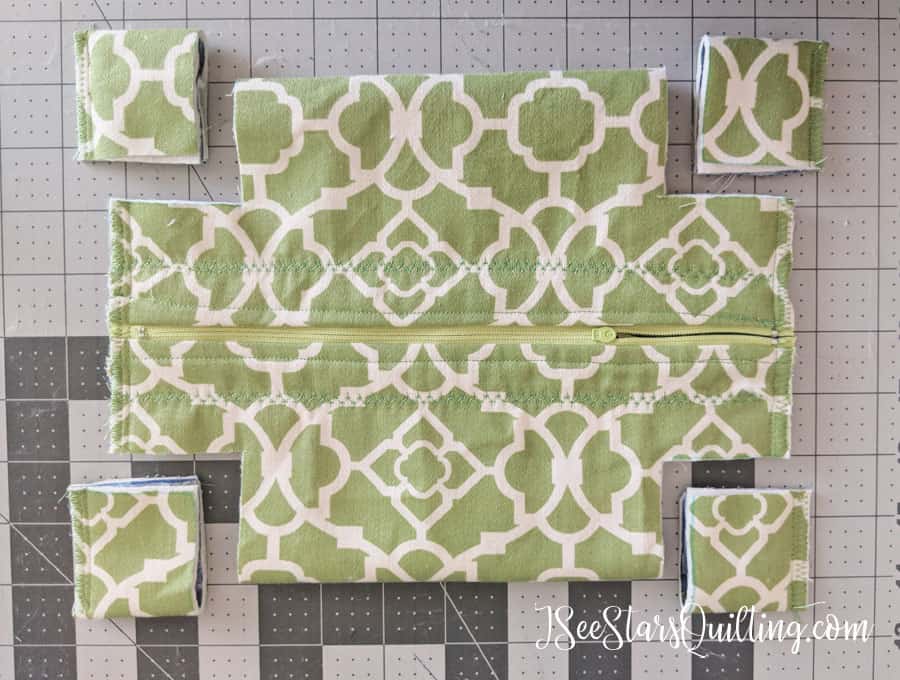
    Then carefully using your rotary cutter and a ruler as your guide for a straight line, cut those squares away from your fabric.

    This is an alternate finishing technique for the final step of the Zipper Box Tote. It comes together in less than an hour! #ZipperBoxtote #easygift

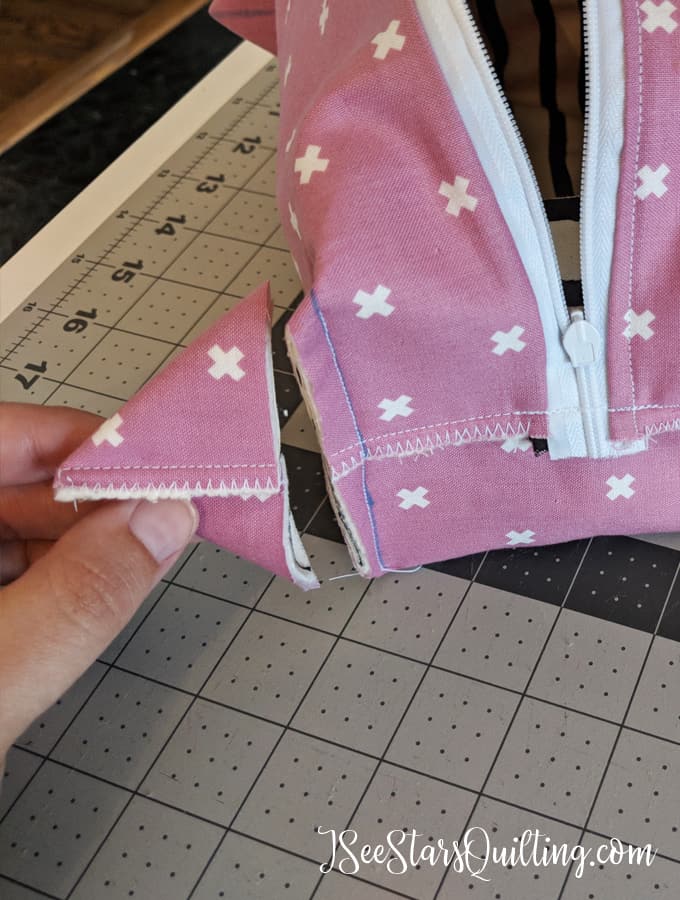
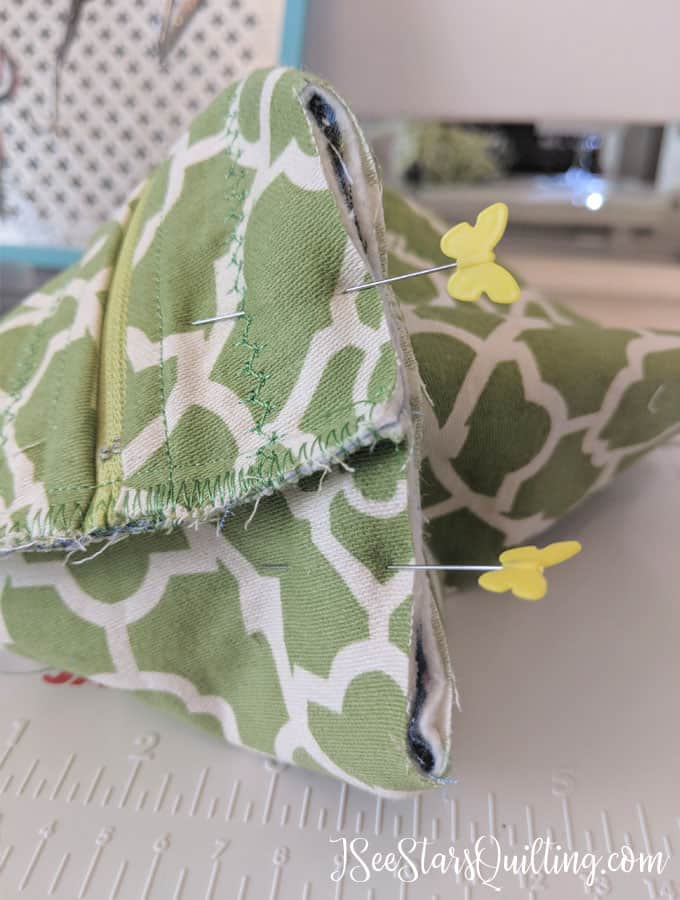
    Next, open the square cuts and pin with edges even. I think pictures speak louder than any words, but to explain a little further, the center of the 90-degree cut you just made will be the top and bottom points on the seam you’re about to sew.

    This is an alternate finishing technique for the final step of the Zipper Box Tote. It comes together in less than an hour! #ZipperBoxtote #easygift

    A little more clarification (skip along if you’ve got this) I want to make sure no one is left confused 🙂

    This is an alternate finishing technique for the final step of the Zipper Box Tote. It comes together in less than an hour! #ZipperBoxtote #easygift

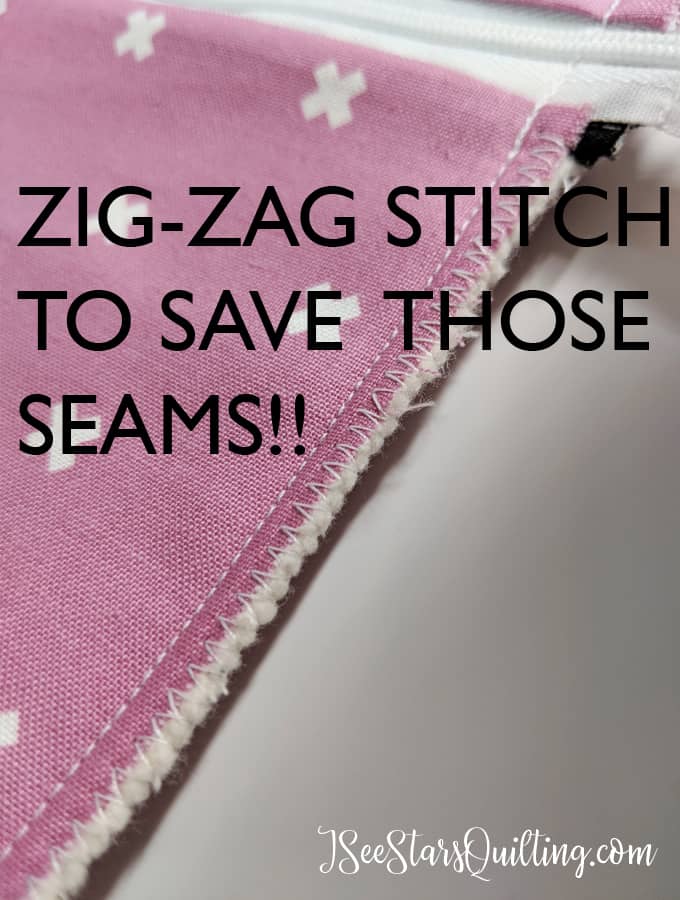
    Sew a 1/4 inch seam allowance down your newly pinned seam, then zig-zag stitch to prevent any further fraying of fabric.

    Do this step for all four corners.

    Before I call my zipper pouch “finished” I take a pair of embroidery scissors and trim any stray wild threads in the interior for a more finished look.

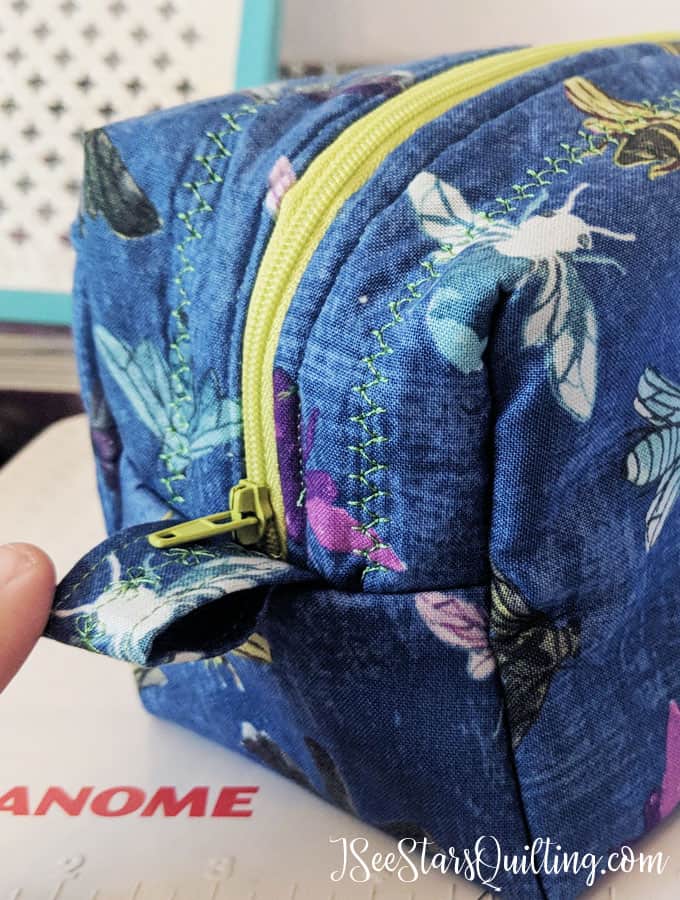
    Turn the bag right side out, and you are finished! Ta-da! Isn’t it cute?

    This is an alternate finishing technique for the final step of the Zipper Box Tote. It comes together in less than an hour! #ZipperBoxtote #easygift

    Adding Decorative Stitches

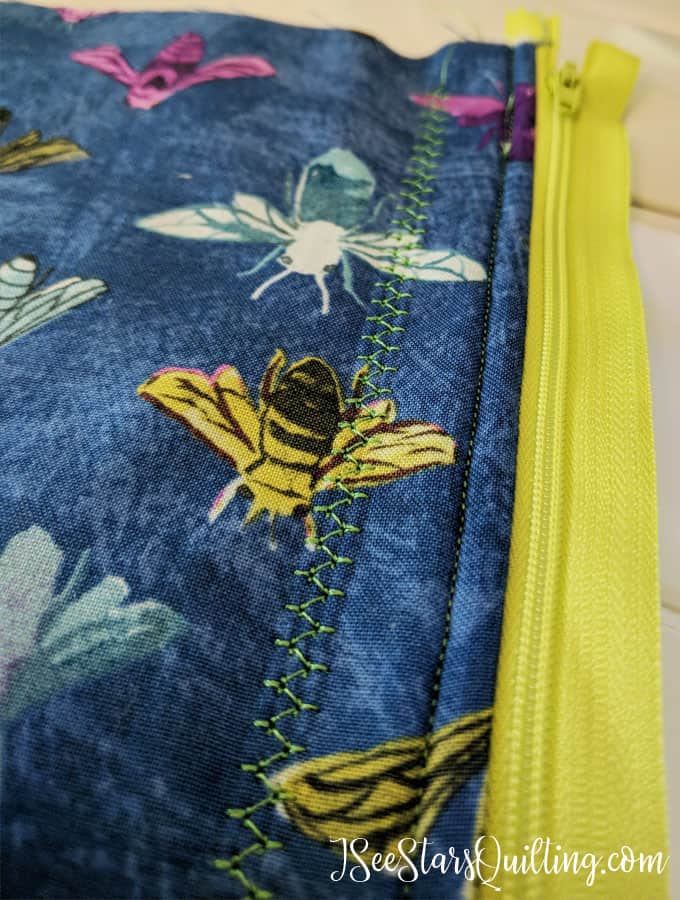
    This is just a little something extra you can add if your home machine has the options of decorative stitches. I love picking contrasting thread for my bags, and this is the perfect venue to show it off.

    Right after you stitch your zipper sides, sew another line of decorative stitches about 1-1.5 inches away from your zipper line. You can’t add it in later, Sorry. Experiment with a few and see what you like.

    This is an alternate finishing technique for the final step of the Zipper Box Tote. It comes together in less than an hour! #ZipperBoxtote #easygift

    Do not stitch too far away from your zipper or your stitching will fall into the sides of your bag. The 1-1.5″ area is just enough to frame out your zipper and still show up on the top of your bag.

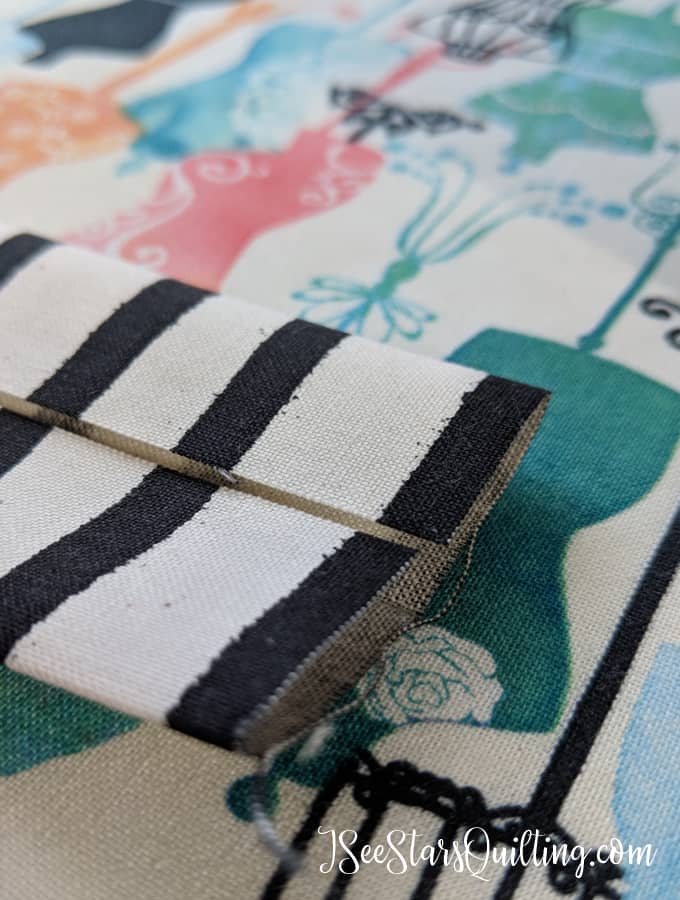
    On this particular bag (which I called the bug bag the entire time I was working on it because… like, I don’t even like bugs, but I love this fabric and combination with the green zipper. Weird right?) I also added a little detail stitching on the zipper pull tabs. See the flowers? I did a line of decorative stitching down the center before I trimmed it in half and added it to my bag.

    This is an alternate finishing technique for the final step of the Zipper Box Tote. It comes together in less than an hour! #ZipperBoxtote #easygift

    I hope you can see how easily customizable this box zipper pouch really is… there are so many possibilities out there, and you can really make it your own.

    Do me a favor and let me know in the comments if you make this? I would love to see your projects! You can tag me @iseestarsquilting or #iseestarsquilting

    Happy sewing and have fun with this one! You’ll be making tons of them soon enough like I am… you have been warned! 🙂

  • Teacher TLC Bags – AKA The One-Hour Zipper Box Tote

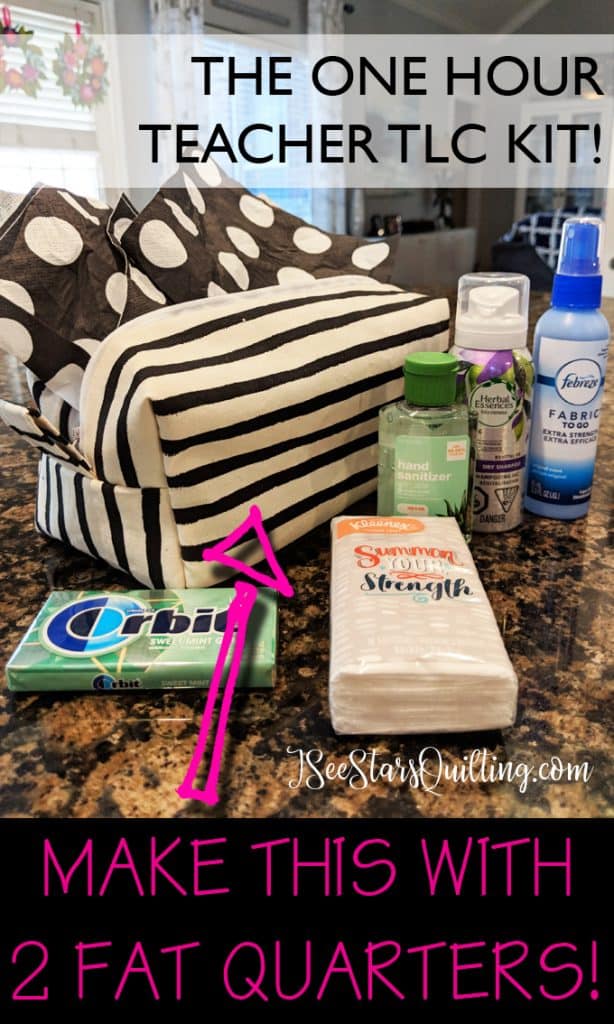
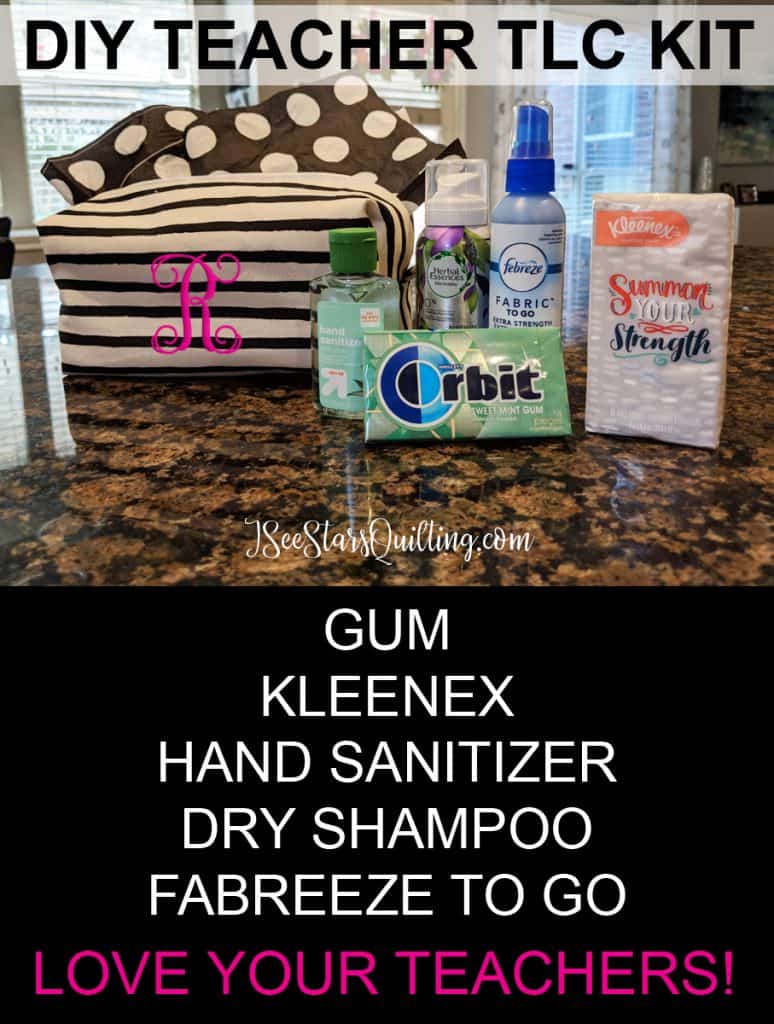
    Is summer coming to an end already? Yikes… Meet the teacher is next week for us. I love to spoil my kid’s teachers because honestly… their dedication is worth celebrating every.single.day. I had a brilliant idea to create these little TLC bags AKA One-Hour Zipper Box Tote for the kid’s teachers on the first day of school.

    DIY TLC Teacher Kit - Box Zipper Pouch

    First, I’ll let you in on what essentials I packed the bags with, then we’ll get to the tutorial so you can make your very own!

    This started with a little trip to Target (….like so many of my other adventures do?) I love the travel container aisle. All the cute little bottles and fun sized soaps. Things are so much cuter when they are tiny, right?

    Each of these was also under $2 each, most were $1. So, you can easily stock up on several essential items and remain within a decent budget. I’m a huge believer that you shouldn’t have to spend a fortune to make someone feel special… just being thoughtful can go a long way. Here was the haul that I scored for these gifts. The total for these items was $5.83

    DIY TLC Teacher Kit - Box Zipper Pouch

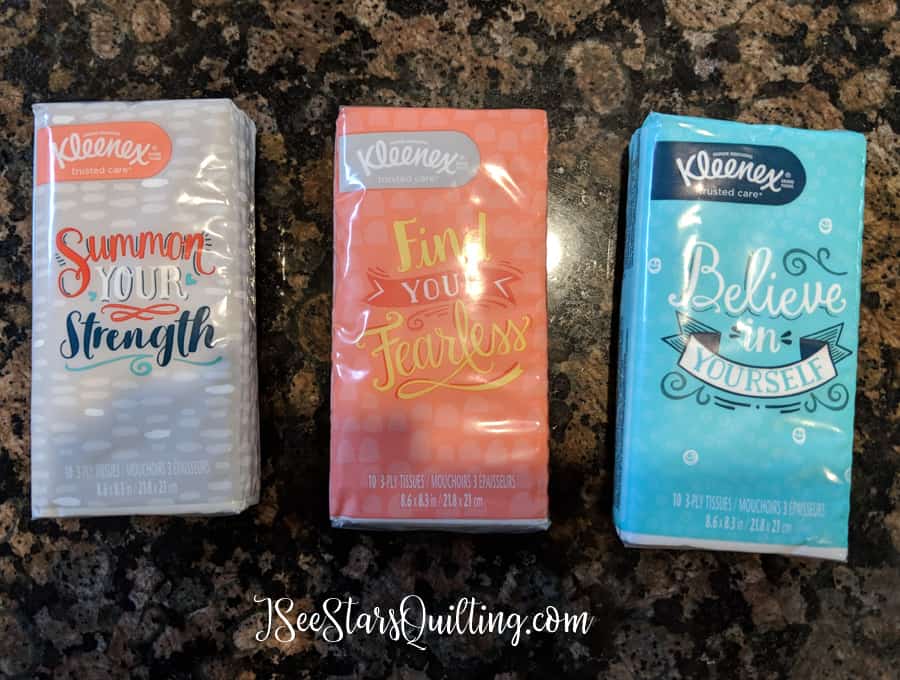
    The Kleenex came in a pack of 3 for $1. Look at these designs! Oh, I just fell in love and had to grab them! Now that I look at them, I don’t know if the messages refer to germs or to kids… but… same thing, right? ha!

    DIY TLC Teacher Kit - Box Zipper Pouch

    Ok, now onto the making of the Zipper Box Tote!

    I love love love this pattern! It’s really quick and easy to pull together. All you need is 2 fat quarters, and about an hour (less if you practice a few of these… you’ll be cranking these babies out like a machine!)

    This post may contain affiliate links, for more information you can click here.

    DIY Teacher TLC kit – AKA The One Hour Box Zipper Pouch

    What you’ll need:

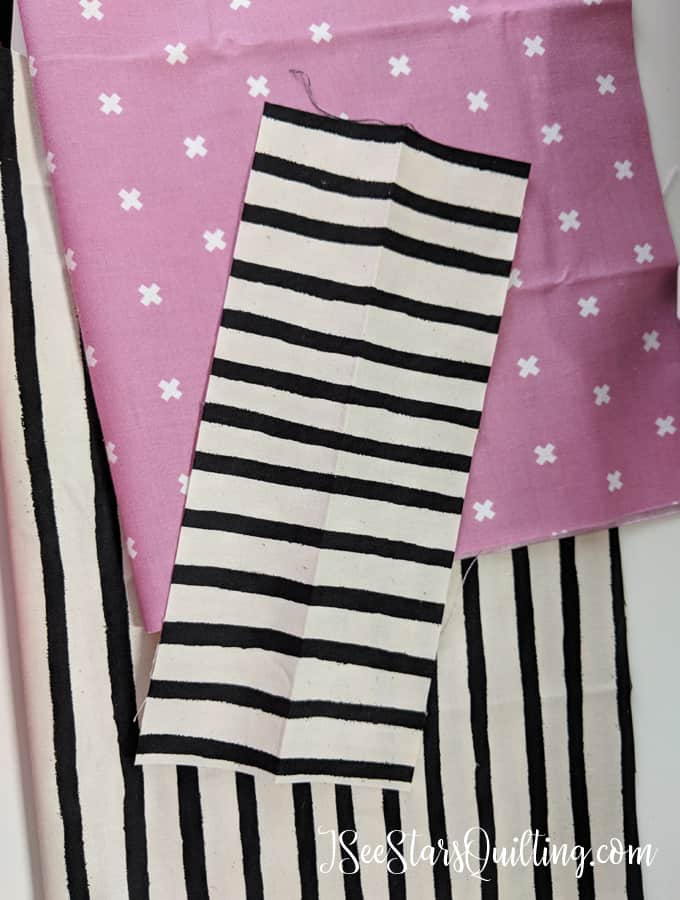
    2 fat quarters (1 for the lining, one for the exterior of the bag) FYI The prints I used are from Cotton + Steel. I love them and wrote a whole post that you can read here if you are interested!
    12 Inch Zipper
    Quilt Batting or interfacing fabric

    DIY TLC Teacher Kit - Box Zipper Pouch

    Cuts to make:

    Lining Fabric – 13″x17″
    Exterior Fabric – 13″x17″ AND 4″x7″ for pull tab pieces
    Quilt Batting – 13″x17″

    ****Note: Do not use a directional print with these cuts. This pattern works best with a non-directional print. ****

    Assembly:

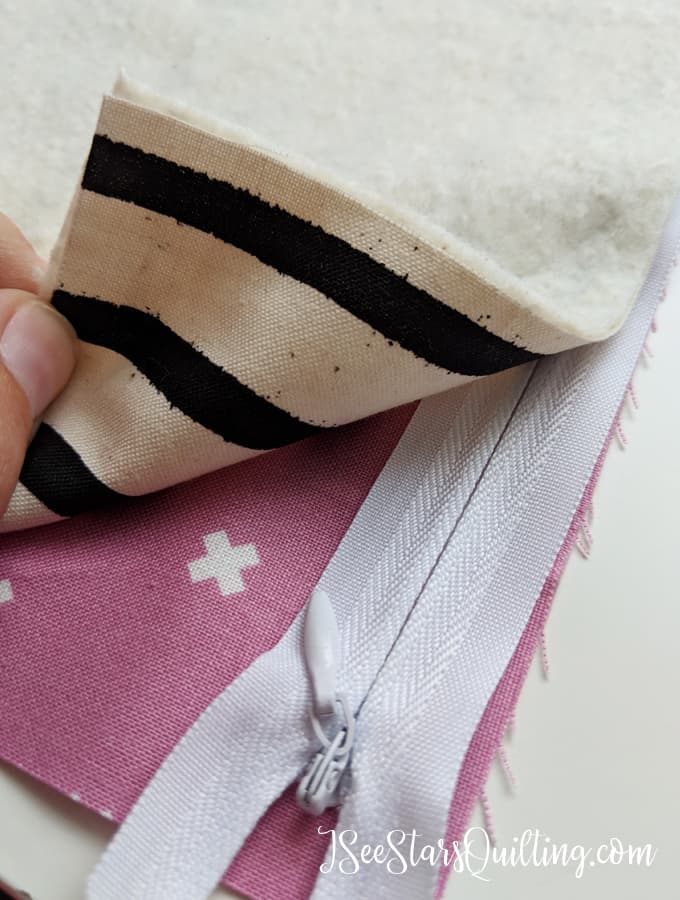
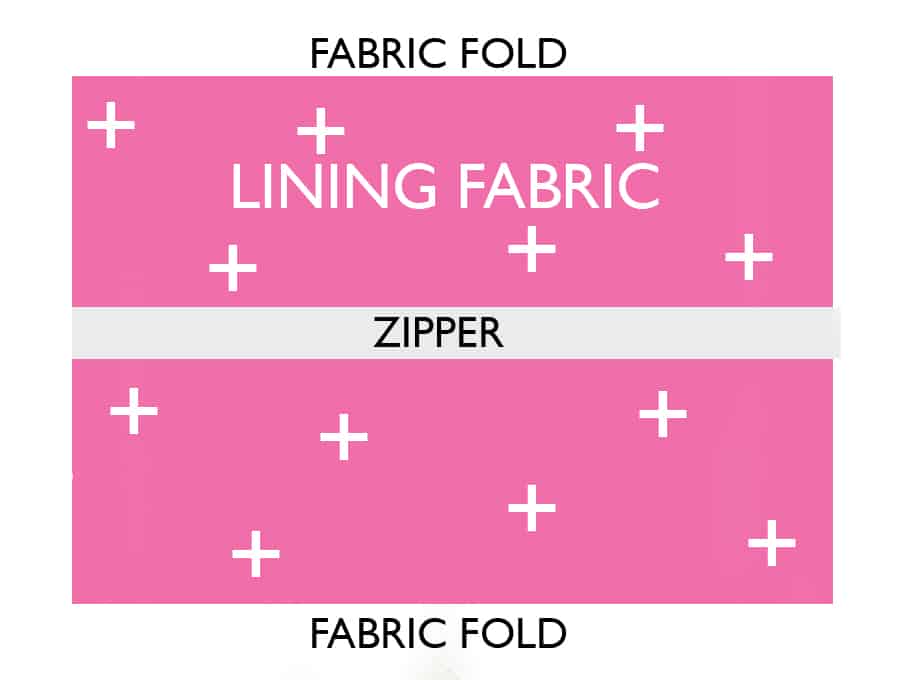
    1. It is time to make your zipper sandwich! Place your lining fabric right side up. (mine is the pink cross fabric) Then, line up one side of your zipper with the edge of your lining fabric on the 13″ side Make sure you lay the zipper right side up! Don’t mess this part up or you’ll have an upside-down zipper and quite a mess.
    2. Next, layer your exterior fabric followed by your batting fabric. If you’re having trouble with the layers, you can pin the exterior fabric to the batting, just remember to take the pins out after it is secure.DIY TLC Teacher Kit - Box Zipper Pouch
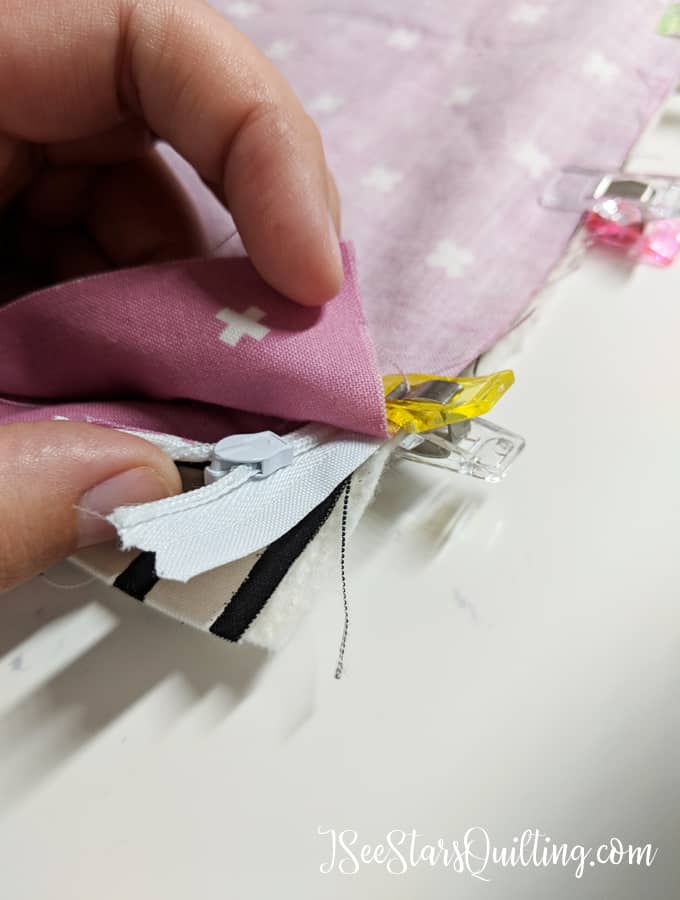
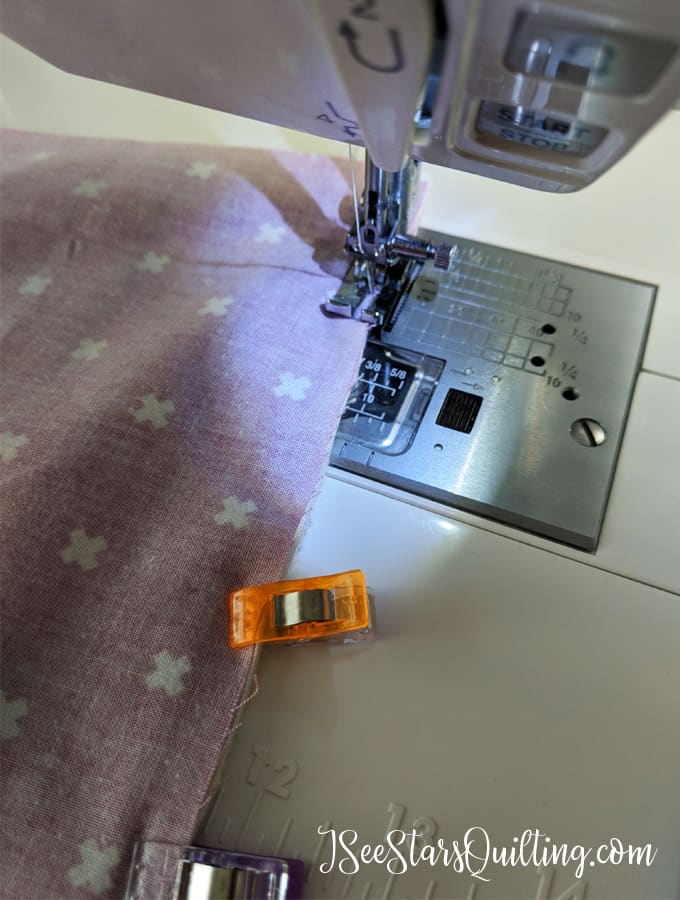
    3. I use clips to keep everything in place while I sew.  It’s much easier than pins in my opinion… but, whatever floats your boat and makes you feel more comfortable! Use a 1/4″ seam allowance and stitch all the way down one side of the zipper STOPPING about 1″ from the zipper pull. DO NOT sew the area where the zipper pull is.

      DIY TLC Teacher Kit - Box Zipper Pouch
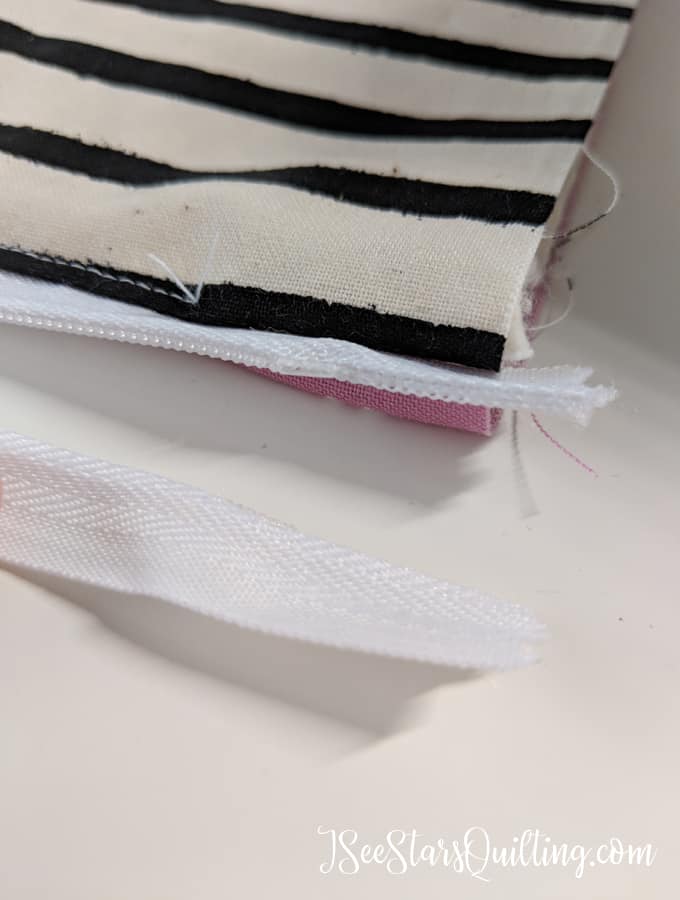
    4. Take your fabric off the machine and unzip the zipper pull past the area where you have just sewn. This will make it easier to get an even straight seam. Finish sewing where you left off.  This makes it easier and yields a cleaner, more even result along your zipper. I usually will do just a short backstitch to keep the threads in place and secure the zipper as it gets a lot of use and you want the fabric to withstand the wear and tear of the zipping.DIY TLC Teacher Kit - Box Zipper Pouch
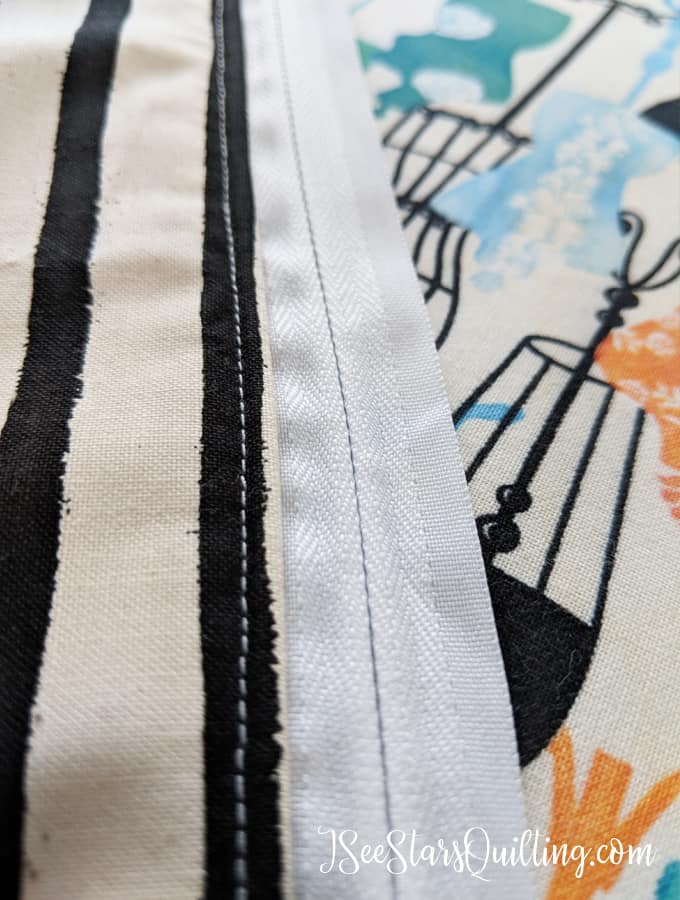
    5. Next, we will be topstitching!  Press your fabric away from your zipper. I suggest using an iron for this. You don’t want the fabric to get bunched up around the zipper or have an excess because it will look less professional. PLEASE be careful… metal zippers get hot under the iron… ahem… or so I have heard… — just a friendly warning! And if you have a plastic zipper… do NOT iron on it. duh.Go back to the machine and stitch just next to your newly pressed fabric. About 1/8″ from the fold. This looks really sharp on your zipper pouch and adds another layer of security to keep your pieces together. I just love top stitching!

      DIY TLC Teacher Kit - Box Zipper Pouch

    6. Now it is time to repeat this same zipper stitching process on the other side of the fabric. Layer the lining right side up, the zipper and then the exterior fabric right side down. The fabrics will make a “w” shape with the zipper being at the center of the middle peak… it can be a little confusing the first time you do this, but after you get it, it will all make sense. Trust me and persevere! Use your clips or pins to keep things steady and in place while sewing.DIY TLC Teacher Kit - Box Zipper Pouch
    7. Stitch all the way down your zipper. If you choose to the side where your zipper pull is, just skip down to about an inch below your pull and start sewing there. You can go back and unzip like before to finish it out. Your seam allowances will be nice and even if you don’t try to sew around the pull part! Do yourself a favor and just take the extra 3 seconds for this step!
    8. Again, Press the fabric away from the zipper gently and top stitch down the side. I unzipped as far as I could go without letting the zipper slide out for this part. It can get a bit tricky to maneuver the fabric “tube” that you have created but doable. Just go slowly and ensure that the rest of your fabric doesn’t get snagged and drawn in by the machine.DIY TLC Teacher Kit - Box Zipper Pouch
    9. Turn your pouch wrong (lining) side out and then flatten the pouch so that the zipper (zip it up again!) is centered on top and the exterior sides are facing inside. **Forgive me, I thought I got a picture of this, but apparently, I got excited and forgot or it didn’t save somehow. I’ll try to illustrate so you can understand. I’m sorry!**
      DIY TLC Teacher Kit - Box Zipper PouchI typically eyeball it and don’t mess with rulers or measuring on this step. It’s not an exact science kind of moment. Place a few Pins on either side of the zipper. I really recommend pins over clips here because you do not want this to shift around.
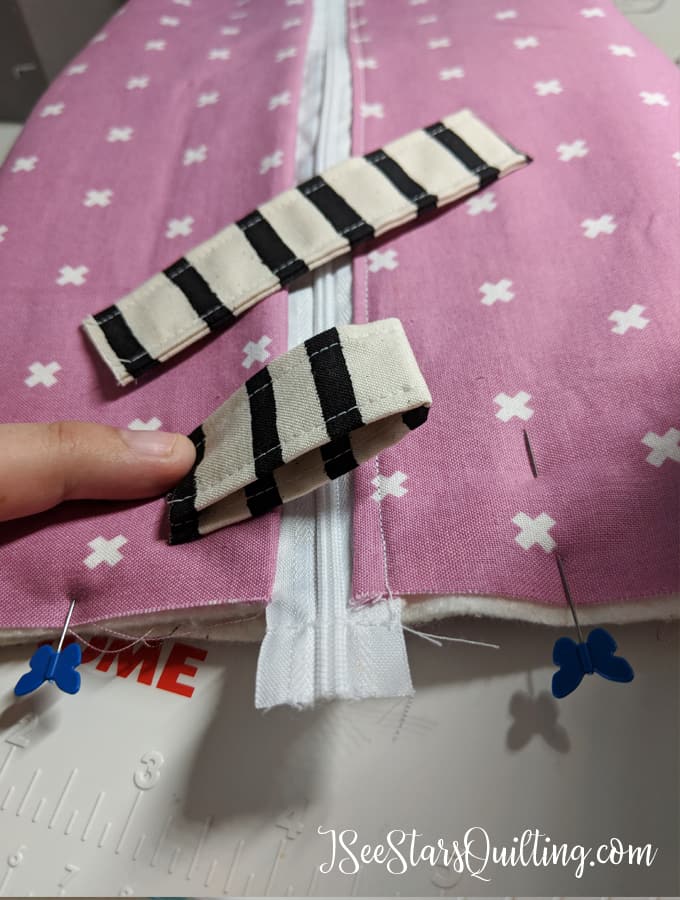
    10. Unzip your zipper about halfway. Do it right now and DO NOT SKIP THIS STEP. Do it. Do it Do it. Unzip it about halfway.
    11. Did you unzip your zipper? Good. 
    12. Set aside your pinned zipper pouch. Take your 4″x7″ pull tab pieces and press in half length-wise. Then fold the 2 raw edges toward the center seam. Press again. (see pic below) Lastly, Fold again along that original center seam. Press it real good.DIY TLC Teacher Kit - Box Zipper Pouch
    13. Your strip should be about a 1″x7″ strip now. top stitch about 1/8″ down both sides of the 7″ length.
    14. Cut in half to get two 1″x3.5″ pieces.  These will be your tab grabs/pulls. These are very helpful for this type of pouch when you try to open and close it.
    15. Fold your tab in half, lining up the raw edges.DIY TLC Teacher Kit - Box Zipper Pouch
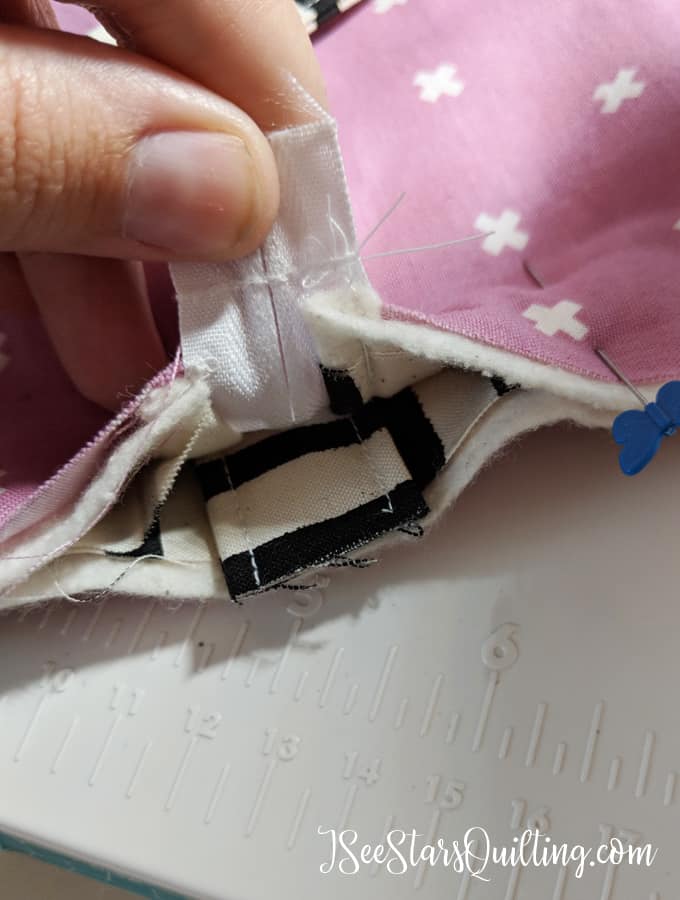
    16. Insert the tab between the exterior sides of the fabric. it should be CENTERED at each side of the zipper. If it is not centered, you will notice it on the finished bag like a sore thumb. Make sure it is centered. The raw edges of the tab should be lined up with the raw edges of the flattened pouch.DIY TLC Teacher Kit - Box Zipper Pouch
    17. Pin the sides of your pouch and the pull into place. Repeat for the other side of your pouch/pull. On the unzipped side, slightly overlap the tails of your zipper to ensure that when they get pulled through the machine they will line up perfectly without a gap.
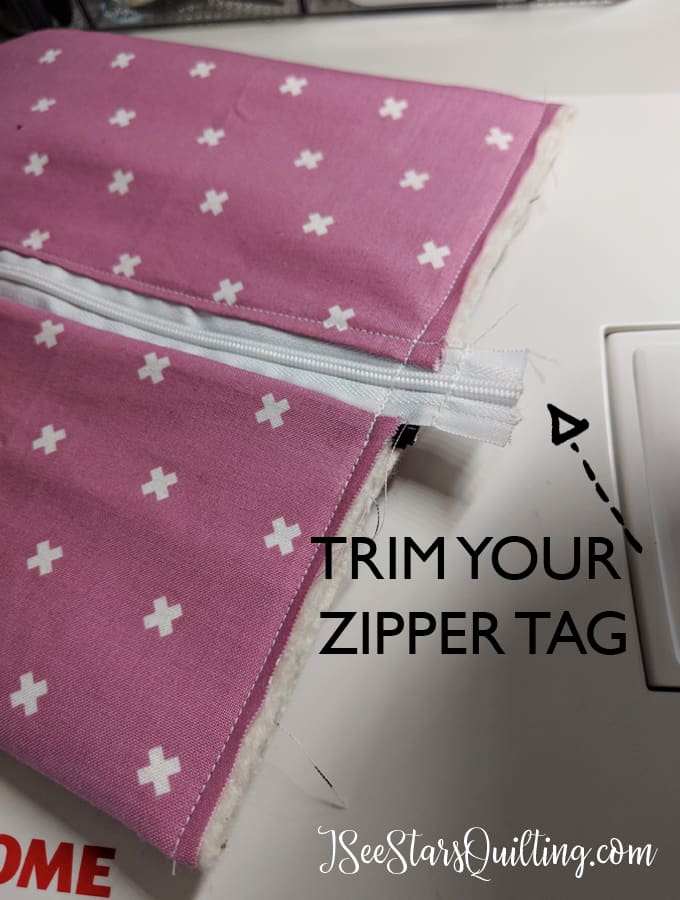
    18. Using a 3/8″ seam allowance, sew along the sides of your zipper pouch. It’s a flat rectangle right now. We will fix it to be cute and boxy soon! Never sew over a metal zipper!

      DIY TLC Teacher Kit - Box Zipper Pouch
    19. (This step is OPTIONAL, but its quick and makes for a really nice seam for the lining of your bag!) Does your machine have a zig-zag stitch? I always get excited when I get to use this stitch. DO NOT zig-zag over any exposed zippers. Just sew as close as you can, skip over it and start again on the other side.DIY TLC Teacher Kit - Box Zipper Pouch
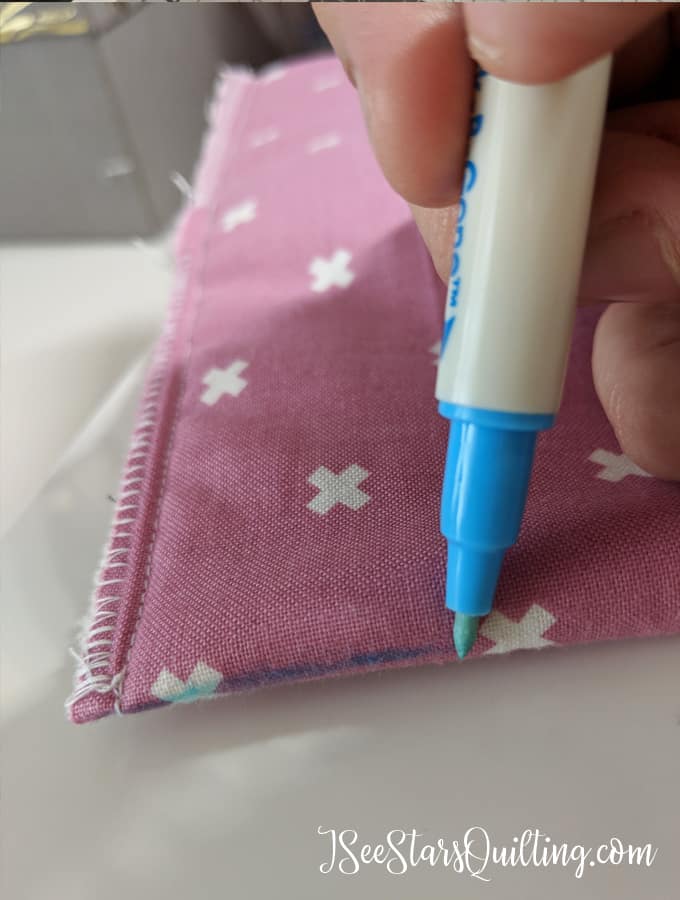
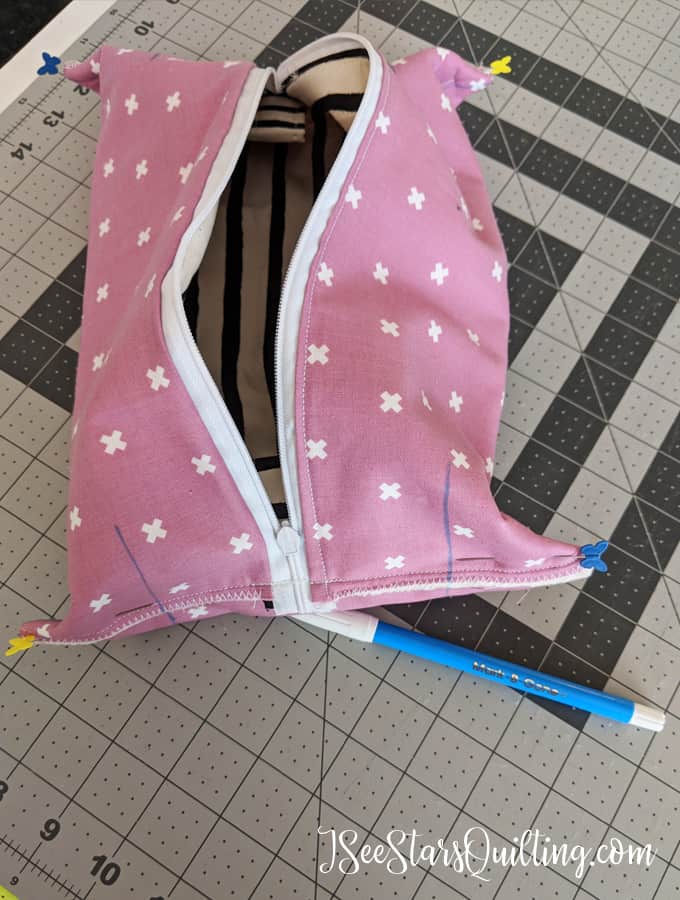
    20. This next step is tricky the first time you do it but it will make sense in just moment. With your pouch laying flat, mark the side seams about 2″ up. Do this for all 4 sides. I use a water-soluble fabric marker. FYI, a pencil doesn’t always come off of the fabric.DIY TLC Teacher Kit - Box Zipper Pouch
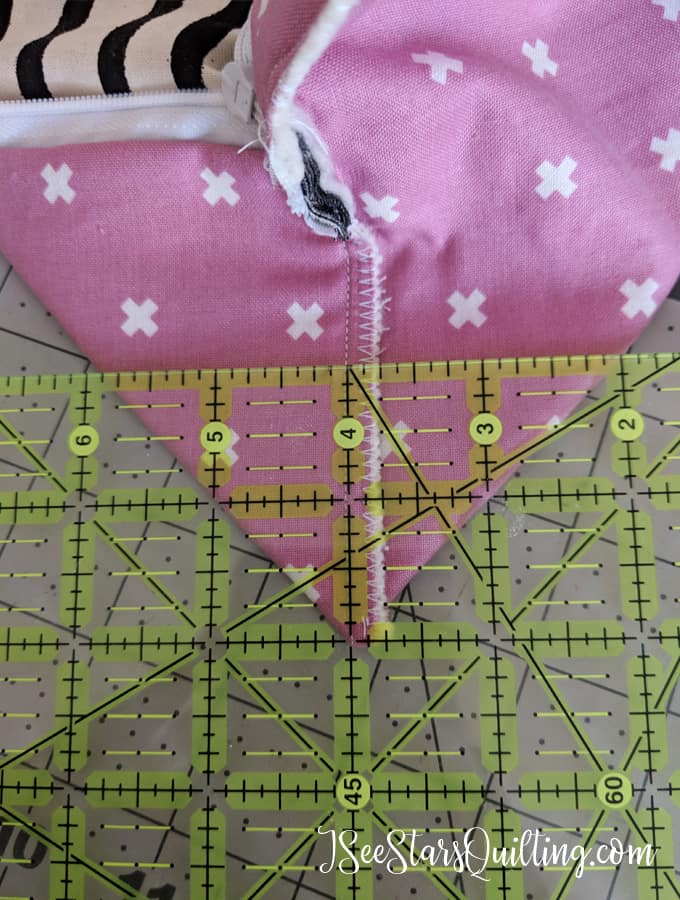
    21. Next, you are going to poof up your pouch and align your zig-zagged seam to the mark you just made. Double check to make sure they line up. Stick a pin in it to keep it in place. You should have a 90-degree angle with your seam coming right up the 45-degree line. Lay it flat on your table. Seam side up. Use your ruler and measure 2″ up the seam of your bag and draw a line across.DIY TLC Teacher Kit - Box Zipper Pouch
      This is what your box should look like with all 4 lines drawn.DIY TLC Teacher Kit - Box Zipper Pouch
    22. Take it to the machine and sew along each newly drawn line. When you do each corner, make sure that your zig-zagged side seam to your pouch lays the same way. If you happen to get it twisted, it is not going to hurt anything but it will lay better if it folds the same direction.
    23. You’re so close to being done! Using your ruler and a rotary cutter, measure 1/4″ from your seam and trim off the extra triangle of fabric. Zig-zag stitch those seams too!
      DIY TLC Teacher Kit - Box Zipper Pouch
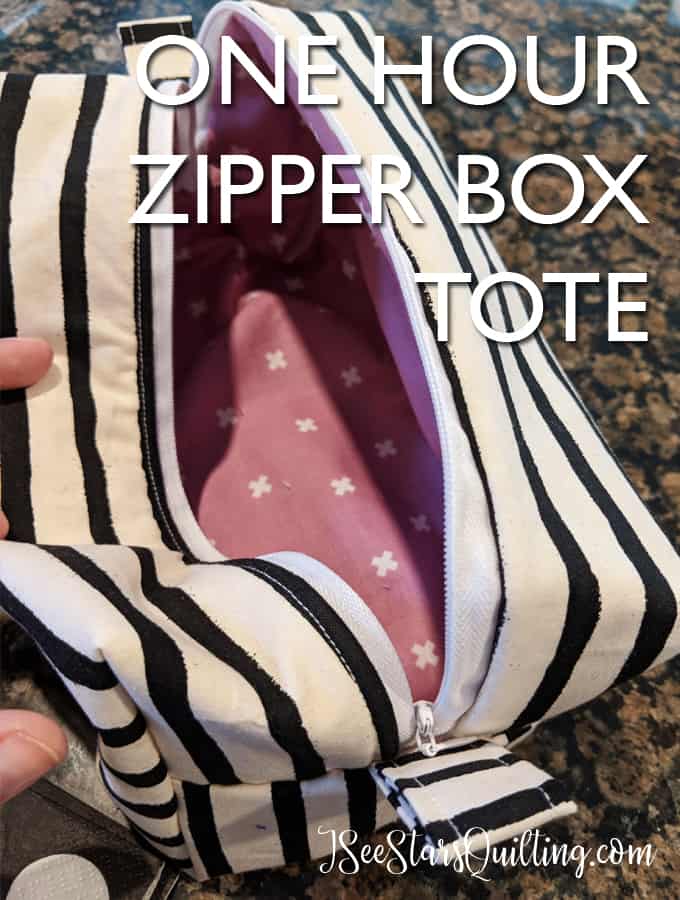
    24. AND that’s a wrap! Turn your Zipper Box tote right side out. Zip it up and marvel in just how quick and easy that was to create!
      DIY TLC Teacher Kit - Box Zipper Pouch

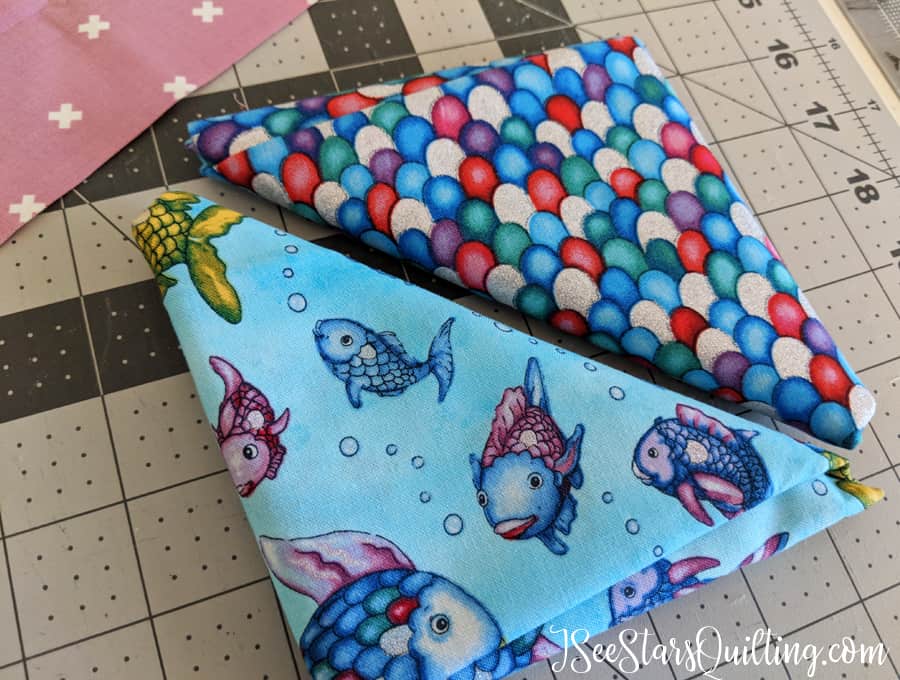
    Wouldn’t you love to have one of these special box totes filled with all your favorite things? I can’t wait to make more 🙂 I found these rainbow fish fat quarters several months back at a little quilt shop. My inner child squealed with delight because I’ve always loved books. I just HAD to buy them… these teacher pouches are absolutely the perfect project for them!

    I’m also planning to embroider the box totes before I give them to the teachers to add just a little something extra!

    A little Rainbow Fish lesson anyone?

    DIY TLC Teacher Kit - Box Zipper Pouch

    If you have made it this far, thank you! I try not to be so long winded but yet provide plenty of instruction. Did you make your own one-hour zipper box tote? Don’t forget to tag me so I can see your beautiful work!

    Let me know if you have any questions. I’m happy to help!

    Cheers & Happy Sewing!

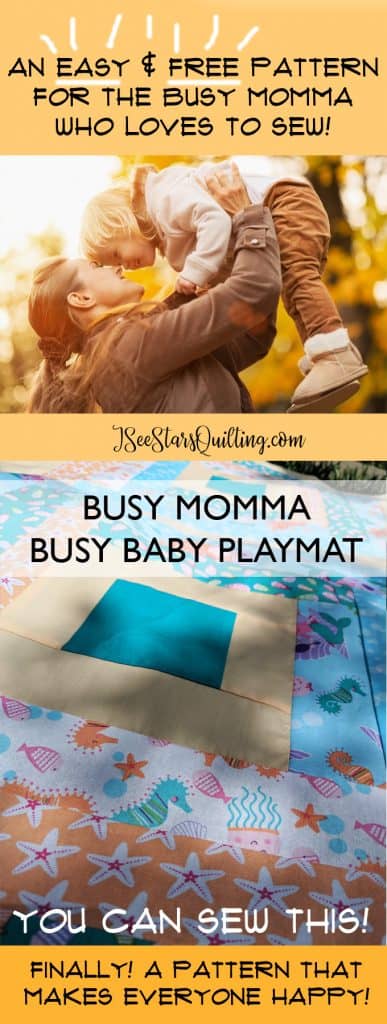
  • Busy Momma Busy Baby Playmat Pattern

    Think you’re too busy to quilt?

    Does a time-consuming pattern leave you feeling less than inspired to quilt?

    Wish there was a way you could make your quilting look impressive without the added confusing pattern or learning new techniques?


    The Busy Momma Busy Baby Playmat is your answer!

    This Busy Momma Busy Baby Playmat Pattern is a game changer in the pattern world! (Yes, I’m offering it for FREE right now) Are you ready for it?

     
    I created this pattern to be both quick & easy. It is a no-fail when you need something that comes together fast and looks like you spent a lot of time on it. (Guess what? … you will spend less time than you think!)
    Let’s face it. Gone are the days where we have the ability to sit around for 8 hours and gossip with our friends while we work on a quilt together.
     
    We live in a fast-paced, busy world and time is precious. We all need a pattern like this in our arsenal for when we need a quick baby gift or playmat for our own kiddos, right?
     
    This pattern is my gift to you. Stay strong and keep quilting, mommas!
     
    Keep the quilting art alive, kick it up a notch with some modern prints and share the love with your family and friends. <3
     
    Happy Quilting!
    -Christen
     
    PS – Don’t forget to tag me in your projects! I’d love to see what you’re creating You can check out my Instagram: @ISeeStarsQuilting #ISeeStarsQuilting #BusyMommaBusyBaby
     
     
    A free pattern built for busy people! The Busy Momma Busy Baby Playmat Pattern is a game changer in the quilt industry!
  • Favorite 15 Minute DIY Vacation Accessories

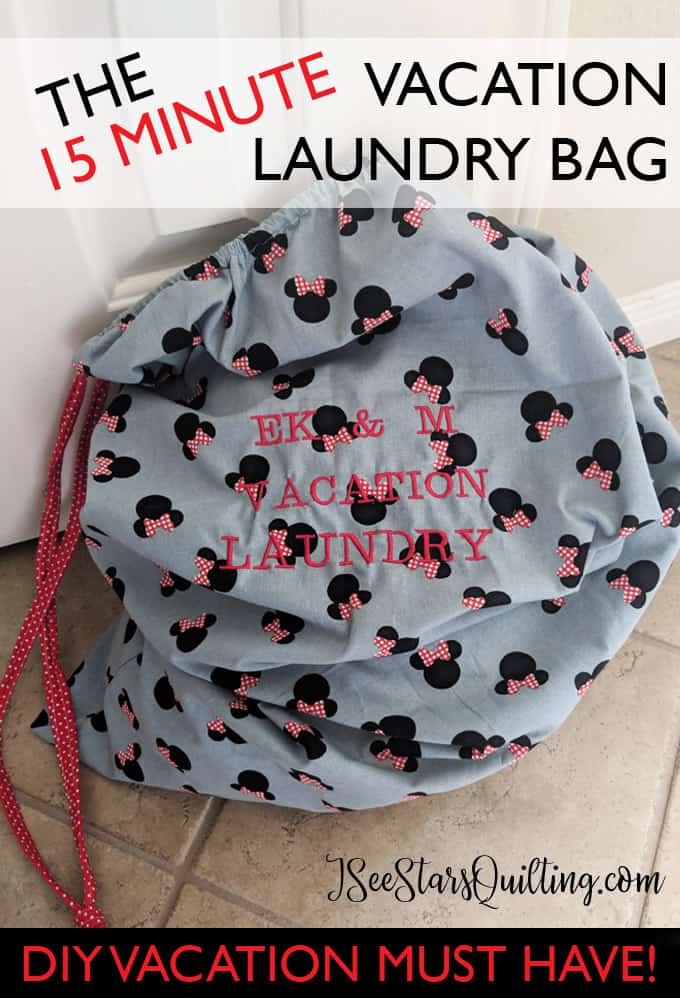
    This project is my absolute favorite thing that I’ve ever made to take on vacation! There are many DIY Vacation Accessories out there, but this one will take you less than 15 minutes! Say What? AND it is a momma’s sanity saver! Yes, it only takes 15 minutes from start to finish.

    Super quick & fun projects are my BFFs.

    When you’re juggling life in suitcases (no matter if its a weekend getaway, a week-long vacay or a month-long car trip) organization is critical. Heck… even just in life in general. We could all use a little sanity saver.

    The most natural organizing on vacation? Keep the dirty clothes separate from the clean clothes. Maybe not if you are a kid though… Honestly, no kid I have ever met is concerned with making sure they have clean underwear on every day. Not a single one. Why is that?

    I shudder to think what would happen if I were not here every day to remind my kids. Hopefully, if I send up enough silent prayers, someday my nagging reminders will sink in, and the kids will be able to survive. They are both still young. We still have time.

    Vacation Sewing Projects

    We just spent a week at Disney World (see how cute my themed fabric is?) … Disney World in July… Summer… in Florida. Not only is it blazing hot, it rained every single day. So between the rain and the sweat, our clothes every single day were disgusting.

    The kids were so caught up in the sugar rush of vacation that they didn’t care how smelly their clothes were… but I did. Oh, yes… I sure did.

    I guess you COULD use a trash bag or the provided hotel plastic laundry bag… but we’re not your typical people. We’re creatives and love a good use for a pretty piece of fabric. I know you get me, sewing mommas. We will make the world a beautiful place together!

    This project is so quick and beginner friendly, you are going to love it… below are the steps to make your own vacation laundry bag!

    15 Minute Vacation Laundry Bag

    What you’ll need:

    1 yard of fabric
    2 yards of ribbon – 1/2 Inch Wide

    What to do:

    1. The first thing we’re going to do is unfold your yard of fabric.
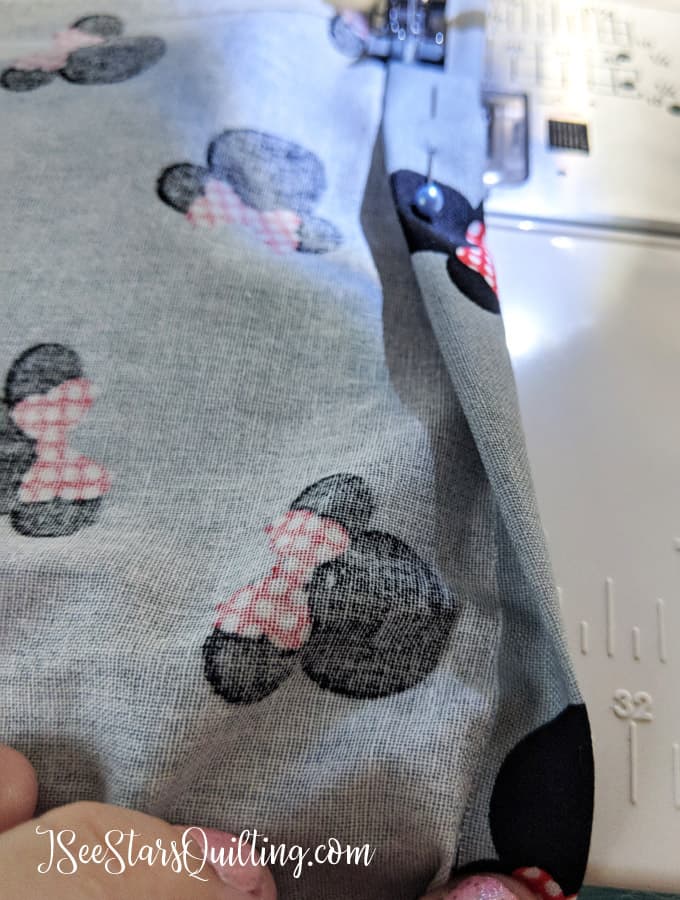
    2. On one of the edges that is 42″ (not the 36″ side!), fold down 3/4″ of fabric, then fold down again. Pin.

      You’ll make a nice clean edge like the image below. This is where your drawstring will go through in just a few minutes.
      Vacation Sewing Projects
      Vacation Sewing Projects

    3. Sew from one edge to the other just at the base of your folded fabric, just enough to hold it down. Make sure there is room enough for your ribbon to go through above your seam.
    4. Fold your fabric right sides together, lining up the selvage edge. If you have a thicker selvage edge that you would rather trim off, you can, but it is not necessary as long as you keep it within the seam in this next step.
    5. Sew along the red line area below taking care not to sew over your drawstring area. Use a 1/4″-1/2″ seam allowance.

      Make sure you back stitch a few times just below the drawstring area to reinforce your stitches.
      Vacation Sewing Projects

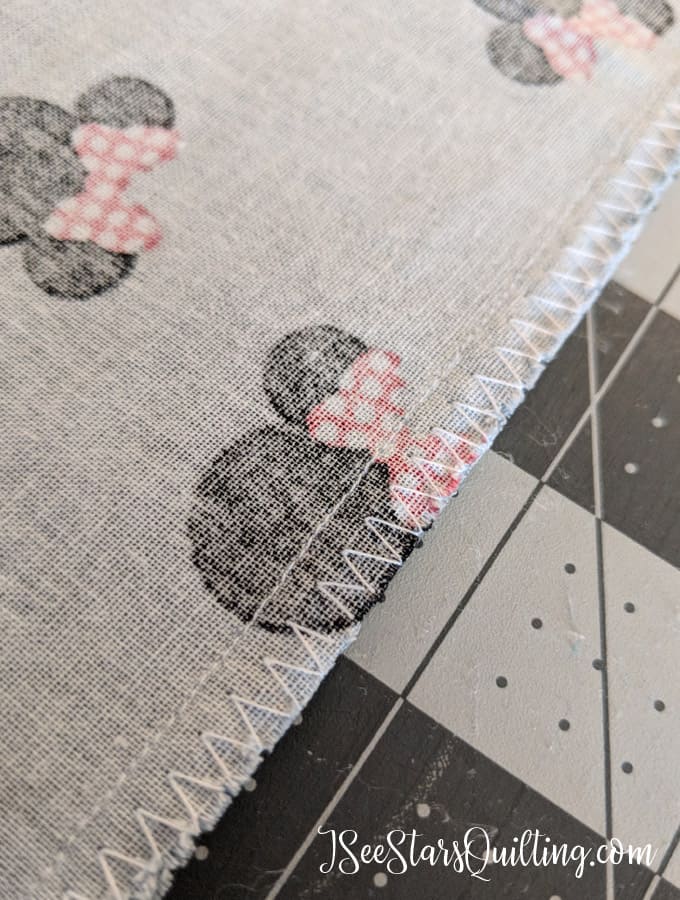
    6. If you chose to trim off the selvage, to keep your fabric from fraying, zig-zag stitch along the raw edge. You might want to test this out on a scrap fabric first if you aren’t familiar with this stitch.

      Vacation Sewing Projects

      When in your machine, the raw side of the zig-zag should line up with the right point of the stitch.

      Vacation Sewing Projects

    7. Turn your laundry bag right side out.
    8. The last step is to thread your ribbon through the drawstring fold. There are a few ways to do this, but the easiest that I’ve found is to use a safety pin through one end of the ribbon. Insert it into one end of the drawstring fold and work it through with your fingers until you come out through the other end. Give it less than a minute, and you’ll find a rhythm. You can also use a paper clip… whatever you can attach to your ribbon and pull through.
    9. Tie a knot with the two ends of the ribbons, so they do not slip back through… and you are good to go!

      I went one step further and embroidered the front of our vacation laundry bag (my husbands expressed his inability to understand why I wanted to do this about nine times)

      Vacation Sewing Projects
      There you have it! Enjoy your cute little laundry bag and a small sliver of sanity on your vacation trip! – Or use this easy bag all around the house to hold everyday laundry, toys, stuffed animals… whatever clutter you want up and out of the way!

      Wishing you all the fun vacation memories you can handle! 🙂 Happy Sewing! 

    ISeeStarsQuilting

    PS – Don’t forget to tag me in your photos! #ISeeStarsQuilting #ISeeStarsQuiltingProjects I love to see your beautiful work!

    Another one of my favorite DIY vacation accessories that I brought with us on this trip was this lovely little thing. It helped keep everyone’s most essential items together every single day in the hotel room. Jewelry, Cards, Magic bands and watches, as well as any loose change or trinkets, find during our stay. It was the perfect way to make sure something didn’t get lost under the bed and accidentally left. (bonus, it doesn’t take up a lot of room in your suitcase because it folds flat!)

    The Perfect (easy) Catch all the mess fabric bin

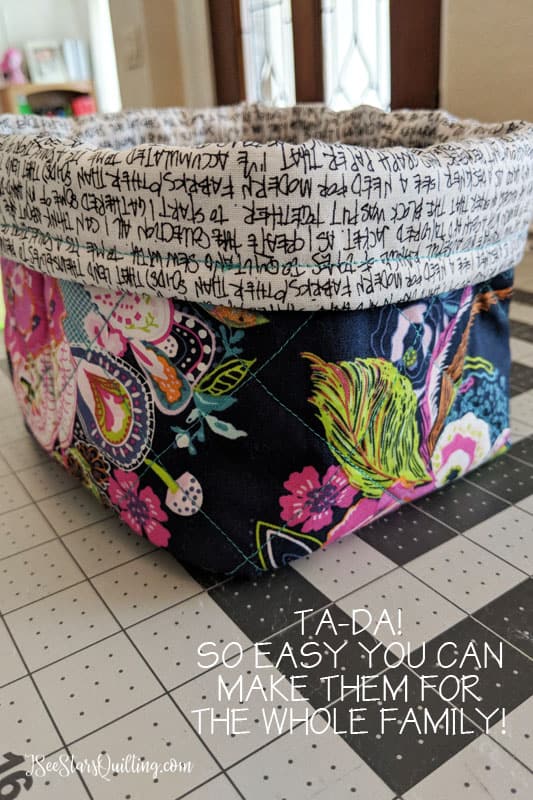
    These perfect catch-the mess fabric bins are another super easy project. You can read my tutorial on how to make them!

    What is your favorite DIY vacation accessory?